
Double Crusted Strawberry Pie: A Slice of Sweet Nostalgia
Ah, strawberry pie, the quintessential dessert that brings up memories of sun-soaked afternoons, barbecues, and family gatherings. There’s something magically nostalgic about a slice of double-crusted strawberry pie, isn’t there? The moment that first forkful hits your tongue, you’re transported to carefree days spent picking strawberries, usually accompanied by laughter and sunshine. It’s not just the flavors that warm your heart; it’s the memories that come rushing back like a flood of sweetness.
Here at Sweet Ladle, we’re all about capturing those moments in the kitchen, and this double crusted strawberry pie is no exception. The flakiness of the crust, the vibrant sweetness of the strawberries, and a hint of tang from the lemon juice — oh, my mouth is watering just thinking about it! It’s a dish that’s not just a dessert; it’s a celebration of all the wonderful things life has to offer: love, family, and that endlessly satisfying bite of golden crust paired with a luscious filling.
When I think back to my childhood, my mind wanders to summers spent at my grandmother’s house, where her homemade strawberry pie was legendary among all family and friends. We’d pick fresh strawberries from her garden, laughter spilling over as we tried to find the ripest, juiciest ones. Once we returned home, the magic happened in her cozy kitchen — the sweet aroma of strawberries would fill the air, accompanied by the sound of a wooden spoon gently mixing the filling. My grandmother had a special knack for making everything feel infused with warmth and love. Now, I try to carry that tradition forward through my baking. So, let’s dive into this delightful recipe that pays homage to those cherished memories!
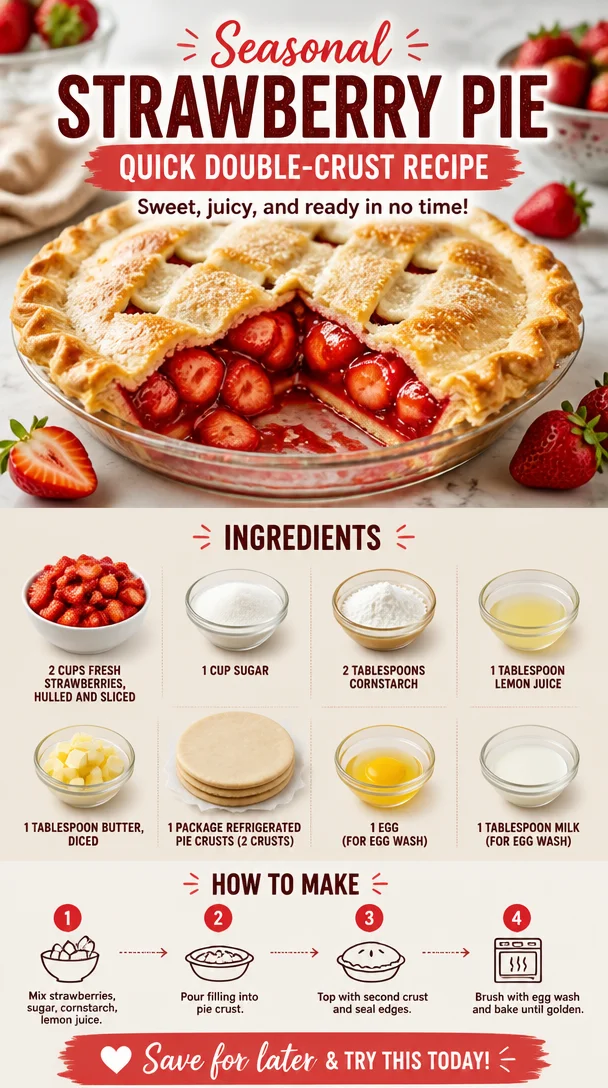
Ingredients
For this delicious double crusted strawberry pie, you’ll need the following:
-
2 cups fresh strawberries, hulled and sliced
Fresh strawberries are the star of this show! They’re bursting with flavor during their peak season (late spring through summer), offering that sweet, juicy goodness. If fresh strawberries are out of season, you can substitute with frozen, but be sure to thaw and drain them to avoid excess moisture. -
1 cup sugar
This is the sweetener that enhances our strawberries. I recommend using granulated sugar for a clean sweetness. If you’re looking to cut down on sugar, try using half the amount or substituting with a natural sweetener like honey or maple syrup. -
2 tablespoons cornstarch
Cornstarch acts as a thickening agent, giving our filling that perfect, ooey-gooey texture without being overly runny. If you don’t have cornstarch, you can use arrowroot powder or even flour as a substitute; just keep in mind flour may give a slightly different texture. -
1 tablespoon lemon juice
A splash of lemon juice brightens the flavors and balances the sweetness of the strawberries. If you’re out of lemon juice, a bit of apple cider vinegar can work in a pinch! -
1 tablespoon butter, diced
Adding butter to your filling brings a lovely richness that contrasts beautifully with the strawberries. If you’re looking for a dairy-free option, you can use coconut oil instead. -
1 package refrigerated pie crusts (2 crusts)
Using store-bought crust simplifies the process (and saves time!). If you’re feeling adventurous, you can make your own pie crust — it can be a fun activity! For a gluten-free variation, look for gluten-free pie crusts available in stores or try a nut-based crust. -
1 egg (for egg wash)
An egg wash gives the crust that beautiful golden color when baked and enhances the visual appeal. If you’re vegan, you can brush the crust with almond milk or a mixture of water and cornstarch instead. -
1 tablespoon milk (for egg wash)
Just a dash of milk mixed with the egg helps to achieve that shiny finish. Use almond or oat milk for a dairy-free option!
Step-by-Step Instructions
Now that we have our ingredients lined up like little soldiers, let’s get to the fun part — baking! Follow these steps to create a pie that would make anyone’s grandmother proud.
-
Preheat that oven!
Start by preheating your oven to 425°F (220°C). This step is crucial because a hot oven helps develop the flakiness in the crust, so don’t skip it! -
Prepare your strawberries.
While the oven heats up, get your fresh strawberries prepped! Hull (remove the green tops) and slice them into halves or quarters, depending on how chunky you like your filling. The more chunky bits, the more flavor in each bite! -
Create the sweet filling.
In a medium bowl, combine the sliced strawberries with sugar, cornstarch, and lemon juice. Toss everything together gently to coat the strawberries with the mixture. You want those lovely, juicy berries to release just enough liquid without becoming a mushy mess. Let this mixture sit for about 10-15 minutes to allow the flavors to meld together. -
Roll out the pie crust.
Take your refrigerated pie crusts from the package, and place one in a 9-inch pie dish. If the crust is too cold to roll out, you can let it sit at room temperature for about 10-15 minutes. -
Fill the pie crust.
Once your strawberries have macerated, pour the filling into the prepared crust. Make sure to scoop out all those delicious juices! Dot the filling with small pieces of butter, as it will enhance the richness of the pie. -
Top it off!
Roll out the second pie crust and place it over the filling. You can either cut slits into the top crust for a classic lattice style or simply cover it and cut a few vents for steam to escape. Either way, your pie will look stunning! -
Egg wash time!
In a small bowl, whisk together the egg and milk to create your egg wash. Brush it over the top crust to give it that beautiful golden color while baking. It’s those little touches that really make it shine! -
Bake!
Pop your pie into the preheated oven and bake for about 40-45 minutes, or until the crust is golden brown and you can see the filling bubbling up through the vents. Your kitchen will start smelling like a slice of heaven by now! -
Cool down.
Once out of the oven, let the pie cool at room temperature for at least an hour. This is crucial! Allowing it to cool helps the filling set, so it slices beautifully rather than falling apart.
Serving Suggestions
When it comes to serving your double crusted strawberry pie, the options are endless! You can serve it warm or chilled, depending on your mood. A classic scoop of vanilla ice cream or a dollop of whipped cream on top never hurt, either! For a little something extra, garnish each slice with fresh mint leaves or a sprinkle of powdered sugar to elevate the presentation. Not only will it look inviting, but it tastes even better!
Recipe Variations
Feel free to get creative with your strawberry pie! Here are some fun variations to try:
-
Mixed Berry Medley: Swap out half of the strawberries for blueberries or raspberries to make a mixed berry pie. Each berry brings its unique flavor!
-
Lemon Zest Twist: Add a teaspoon of lemon zest to amplify that citrus zing. It’ll balance perfectly with the sweetness of the strawberries.
-
Maple Sweetener: Instead of granulated sugar, try using maple syrup for a deeper, caramel-like sweetness. The flavor pairs beautifully with the strawberries!
-
Nutty Crust: Mix ground almonds or walnuts into your crust for a delicious crunch and additional flavor.
-
Chocolate Drizzle: After cooling, drizzle some melted chocolate over the pie for a delightful chocolate-strawberry fusion. Yes, please!
Chef’s Notes
Over the years, this double crusted strawberry pie has transformed from my grandmother’s cherished recipe to my own beloved creation. Sometimes, I still find myself recreating her magic in my kitchen — albeit with a twist. The most precious moments come when I watch my own kids savor every bite, fingers sticky with juice and smiles stretching from ear to ear. It’s in these moments that I truly see the legacy of love and warmth that baking can create.
If you ever find that your pie filling is too runny, don’t worry! A little extra cornstarch can help thicken it up in the future. Just remember, baking is a journey, and each recipe is an evolution of your own flavor preferences and techniques.
FAQs and Troubleshooting
1. My pie crust turned out soggy. What happened?
A soggy crust often results from too much moisture in the filling. Be sure to drain excess juices from the strawberries before pouring them into the crust, and don’t skip the chilling step if you’re using homemade crust!
2. Can I use frozen strawberries?
Absolutely! Just make sure to thaw and drain them before using. They will let out more moisture, so consider adding a bit more cornstarch for thickening.
3. How can I tell when the pie is done?
Look for a golden-brown crust and bubbling filling. If you’re unsure, you can insert a toothpick into the crust; it should come out clean.
4. Can I make this pie ahead of time?
Yes! You can prepare the pie and store it in the fridge for a day before baking, or even freeze it before baking. Just be sure to adjust the baking time to account for a chilled or frozen pie.
Nutritional Info
While nutritional information can vary based on specific ingredients, here’s a general breakdown per slice (1/8 of the pie):
- Calories: 320
- Fat: 14g
- Carbohydrates: 45g
- Fiber: 2g
- Sugars: 22g
- Protein: 3g
I hope you enjoyed this deep dive into making a delightful double crusted strawberry pie! Whether you’re making it for a special occasion or just because, remember that the greatest ingredient is the love you mix into each step. Let’s bake something sweet together! Happy baking!
PrintDouble Crusted Strawberry Pie
A nostalgic double-crusted strawberry pie that bursts with flavor and evokes cherished memories of summer.
- Prep Time: 15 minutes
- Cook Time: 45 minutes
- Total Time: 60 minutes
- Yield: 8 servings 1x
- Category: Dessert
- Method: Baking
- Cuisine: American
- Diet: Vegetarian
Ingredients
- 2 cups fresh strawberries, hulled and sliced
- 1 cup sugar
- 2 tablespoons cornstarch
- 1 tablespoon lemon juice
- 1 tablespoon butter, diced
- 1 package refrigerated pie crusts (2 crusts)
- 1 egg (for egg wash)
- 1 tablespoon milk (for egg wash)
Instructions
- Preheat your oven to 425°F (220°C).
- Prepare your fresh strawberries by hulling and slicing them.
- Combine the sliced strawberries with sugar, cornstarch, and lemon juice in a medium bowl.
- Let the mixture sit for about 10-15 minutes to allow flavors to meld.
- Roll out one pie crust into a 9-inch pie dish.
- Fill the pie crust with the strawberry filling and dot with butter.
- Top with a second pie crust, cutting slits or vents for steam.
- Whisk together the egg and milk for the egg wash, and brush it over the crust.
- Bake for 40-45 minutes, or until golden brown and bubbly.
- Cool at room temperature for at least an hour before serving.
Notes
Serve warm or chilled with vanilla ice cream or whipped cream. For a twist, try adding lemon zest or swapping in different berries!
Nutrition
- Serving Size: 1 slice
- Calories: 320
- Sugar: 22g
- Sodium: 200mg
- Fat: 14g
- Saturated Fat: 8g
- Unsaturated Fat: 6g
- Trans Fat: 0g
- Carbohydrates: 45g
- Fiber: 2g
- Protein: 3g
- Cholesterol: 70mg
Keywords: strawberry pie, dessert, summer, nostalgia, baking