
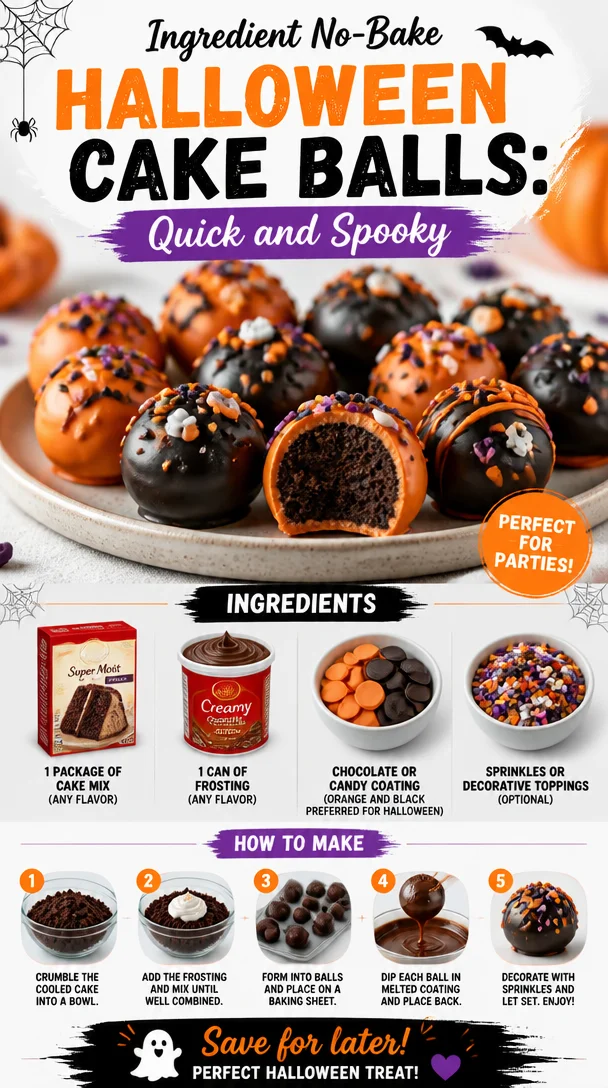
Halloween Cake Balls: A Spooktacular Treat
Ah, Halloween! A time when the air turns crisp, leaves shimmer in shades of orange and gold, and creativity knows no bounds, especially when it comes to food. One of my absolute favorite treats to whip up during this hauntingly delightful season is Halloween Cake Balls. Packed with flavor and dipped in a colorful coating, these little sweet bites are perfect for parties, school events, or just an evening of Netflix and scary movies. Trust me, they disappear faster than a ghost on Halloween night!
When I first made cake balls, I was captivated by their simplicity and versatility. Imagine going from a mundane cake mix to a fabulous, bite-sized treat ready to impress! The process of rolling and coating was like a mini craft project—one I could eat afterward! Each time, I find myself reminiscing about sharing these with friends at our occasional Halloween get-together. With haunting decorations laid out and laughter echoing through the room, these colorful cake balls brought smiles all around.
The scents of chocolate, warm spices, and sweet frosting wafting through the kitchen truly made it feel like the season of spooktacular vibes! So, let’s roll up our sleeves and get ready to create some Halloween magic in the kitchen.
A Bite of Nostalgia
One October evening, I decided to host a small Halloween gathering. Armed with my favorite cake mix and a little creativity, I set out to make these Halloween cake balls. The kitchen was a whirlwind of colorful sprinkles, chocolate melts, and laughter as I invited my closest friends to join me in crafting these delightful treats. As we rolled the cake balls, we shared stories of Halloweens past—favorite costumes, spooky tales from childhood, and even our best and worst candy experiences.
It was more than just baking; it became a bonding experience filled with joy and laughter. We dipped and coated each cake ball in vibrant colors, adorned them with spooky sprinkles, and tasted the sweet creations right off the tray. By the end of the night, our table was overflowing with colorful cake balls, each one a little piece of joy crafted with love and friendship. Those cake balls became the highlight of the evening and set the tone for what would become a yearly tradition. I invite you to join in on the fun of creating, sharing, and even enjoying a few (or more!) this Halloween!
Ingredients
To get started, here’s a list of everything you’ll need for your Halloween Cake Balls:
-
1 package of cake mix (any flavor)
The base of your cake balls. Fun flavors like chocolate, vanilla, or even pumpkin spice can bring out different Halloween vibes. Feel free to experiment with your favorite cake mix! -
1 can of frosting (any flavor)
This moistens and binds the cake mix together. Choose a flavor that complements your cake, be it classic vanilla, devil’s food chocolate, or even cream cheese for a little twist. -
Chocolate or candy coating (orange and black preferred)
This outer layer is essential for giving your cake balls that festive look. Look for candy melts, which are easy to work with, or melting chocolate. The magical part? You can find them in assorted colors, so get creative! -
Sprinkles or decorative toppings (optional)
These are your chance to add a personal touch. Think themed sprinkles like ghosts, webs, or classic Halloween colors. It’s all about having fun and making these treats visually appealing!
Step-by-Step Instructions
Now that we have our ingredients, it’s time to bring these little balls of joy to life with my step-by-step guide:
-
Bake the Cake
Preheat your oven according to the instructions on your cake mix box. Prepare your cake pan by greasing it lightly. Follow the package directions to mix your cake batter and pour it into your prepared cake pan. Bake according to the time specified on the box, typically around 25-30 minutes, or until a toothpick inserted into the center comes out clean.Chef Tip: Don’t overbake the cake, or it’ll be dry! You want a succulent base to hold those delightful cake balls together.
-
Cool the Cake
Once the cake is baked, take it out of the oven and allow it to cool in the pan for about 10 minutes. Then, transfer it to a wire rack to cool completely. This step is crucial because hot cake can melt frosting and make a gooey mess.Little Hack: If you’re short on time, pop the cooled cake in the fridge for a bit to speed up cooling.
-
Crumb the Cake
After the cake has cooled, crumble it into a large mixing bowl using your hands or a fork. You want it to be a fine crumb—there shouldn’t be any large chunks. -
Add the Frosting
Now comes the fun part! Add about half of your can of frosting to the crumbled cake and mix it together with your hands or a spatula until well combined. You want the mixture to be moist but not overly sticky. If it’s too dry, add in more frosting a tablespoon at a time until you reach the perfect consistency.Pro Tip: You can use your favorite frosting flavor! Cream cheese frosting pairs beautifully with pumpkin or spice cakes, while chocolate frosting works wonders with rich chocolate cakes.
-
Form the Cake Balls
Take small portions of the mixture and roll them into balls, about 1 inch in diameter. Place these on a parchment-lined baking sheet. Repeat until all the mixture is rolled into balls.Helpful Hint: Wet your hands slightly to avoid sticking! It makes rolling the balls so much easier.
-
Chill the Cake Balls
Pop the baking sheet in the refrigerator for about 30 minutes or until firm. This little chill session will help your cake balls keep their shape when you dip them in chocolate.Fun Fact: You can make these ahead of time and store them in the fridge for a couple of days before coating them!
-
Melt the Coating
While the cake balls chill, melt your chocolate or candy coating. You can do this in a microwave-safe bowl in 30-second intervals, stirring in between, until smooth. If you’re using candy melts, follow the package directions for melting.Chef Hack: Add a teaspoon of coconut oil or shortening to your chocolate to make it a little smoother and easier to work with!
-
Dip the Cake Balls
Take each chilled cake ball and dip it into the melted coating, using a fork or skewer to help. Let the excess coating drip off before placing the cake ball back on the baking sheet. Sprinkle any decorative toppings on top before the coating sets.Reminder: Work quickly! The coating can set fast, especially if it’s cooler in your kitchen.
-
Let Them Set
Allow the cake balls to sit at room temperature or be placed back in the fridge until the coating has completely set—about 20 to 30 minutes. -
Serve and Enjoy!
Once set, arrange these festive treats on a platter and serve at your next Halloween gathering, or enjoy an evening of spookiness with family!
Serving Suggestions
To elevate your serving game, think about using a decorative platter or a spooky cake stand. You could also use Halloween-themed cupcake liners to hold each individual cake ball. If you’re feeling fancy, consider drizzling more melted chocolate over the top or placing your cake balls in small cauldrons (those black plastic ones) for a fun and festive touch!
Recipe Variations
-
Pumpkin Spice Cake Balls: Substitute your regular cake mix for a pumpkin spice version. Use cream cheese frosting for a deliciously decadent treat.
-
Cookie Dough Filling: Make a batch of edible chocolate chip cookie dough (using heat-treated flour) and roll it into the center of your cake balls for a surprise filling.
-
Peanut Butter Chocolate: Use chocolate cake mix with peanut butter frosting and dip in chocolate-coating—the perfect blend of flavors for chocolate and peanut butter lovers!
-
Vegan Option: Use a vegan cake mix and a dairy-free frosting, and dip in dairy-free chocolate or candy melts for a festive treat that everyone can enjoy.
Chef’s Notes
Creating these Halloween Cake Balls has been an adventure in the kitchen over the years! I’ve tried countless flavors and countless coatings, and each time, I discover something new and tasty. The visual appeal is half the fun, and watching friends’ eyes widen as they bite into these colorful treats is priceless.
There was that one Halloween where, in a flurry of creativity, I introduced a chili chocolate dip for a spicy twist! The reactions were priceless; some were brave enough to try, and others ran for the sweets table. But that’s the magic of baking—each iteration brings new stories and laughter.
FAQs and Troubleshooting
-
Why are my cake balls crumbling?
If your cake balls are crumbling apart, you may need to add more frosting to the mixture. Remember—the right consistency holds them together! -
How do I keep the chocolate coating smooth?
Adding a little coconut oil or shortening to your chocolate when melting helps achieve that perfect gooeyness! Stir well to avoid any lumps. -
Can I freeze cake balls?
Absolutely! The cake balls can be frozen before or after coating. Just make sure to place them in a single layer on a baking sheet, then transfer to an airtight container with parchment in between layers to avoid sticking. -
How do I make the coating set faster?
If you’re in a rush, placing the dipped cake balls in the fridge can help speed up the setting process. Just be careful not to leave them in there too long, or you might end up with a chilled treat!
With this delightful recipe, your Halloween is sure to be filled with laughter, flavor, and memories. Baking should be a joyous journey, so gather your friends, turn on some spooky music, and let’s create some sweet magic together! Happy Halloween, fellow foodies! 🍬🎃
PrintHalloween Cake Balls

Delightful bite-sized cake balls perfect for Halloween celebrations, dipped in colorful coatings and covered in festive sprinkles.
- Prep Time: 20 minutes
- Cook Time: 30 minutes
- Total Time: 50 minutes
- Yield: 24 servings 1x
- Category: Dessert
- Method: Baking
- Cuisine: American
- Diet: Vegetarian
Ingredients
- 1 package of cake mix (any flavor)
- 1 can of frosting (any flavor)
- Chocolate or candy coating (orange and black preferred)
- Sprinkles or decorative toppings (optional)
Instructions
- Bake the Cake: Preheat your oven according to the instructions on your cake mix box. Prepare your cake pan by greasing it lightly. Follow the package directions to mix your cake batter and pour it into your prepared cake pan. Bake according to the time specified on the box, typically around 25-30 minutes, or until a toothpick inserted into the center comes out clean.
- Cool the Cake: Once the cake is baked, take it out of the oven and allow it to cool in the pan for about 10 minutes. Then, transfer it to a wire rack to cool completely.
- Crumb the Cake: After the cake has cooled, crumble it into a large mixing bowl using your hands or a fork.
- Add the Frosting: Add about half of your can of frosting to the crumbled cake and mix it together until well combined.
- Form the Cake Balls: Take small portions of the mixture and roll them into balls, about 1 inch in diameter. Place these on a parchment-lined baking sheet.
- Chill the Cake Balls: Pop the baking sheet in the refrigerator for about 30 minutes or until firm.
- Melt the Coating: While the cake balls chill, melt your chocolate or candy coating in a microwave-safe bowl.
- Dip the Cake Balls: Take each chilled cake ball and dip it into the melted coating, letting the excess drip off before placing it back on the baking sheet.
- Let Them Set: Allow the cake balls to sit until the coating has completely set, about 20 to 30 minutes.
- Serve and Enjoy!
Notes
These cake balls can be made ahead of time and stored in the fridge for a couple of days before coating. Consider using themed cupcake liners or a spooky cake stand for serving.
Nutrition
- Serving Size: 1 cake ball
- Calories: 150
- Sugar: 12g
- Sodium: 150mg
- Fat: 6g
- Saturated Fat: 3g
- Unsaturated Fat: 2g
- Trans Fat: 0g
- Carbohydrates: 20g
- Fiber: 1g
- Protein: 2g
- Cholesterol: 20mg
Keywords: Halloween, cake balls, dessert, festive treats, party food