
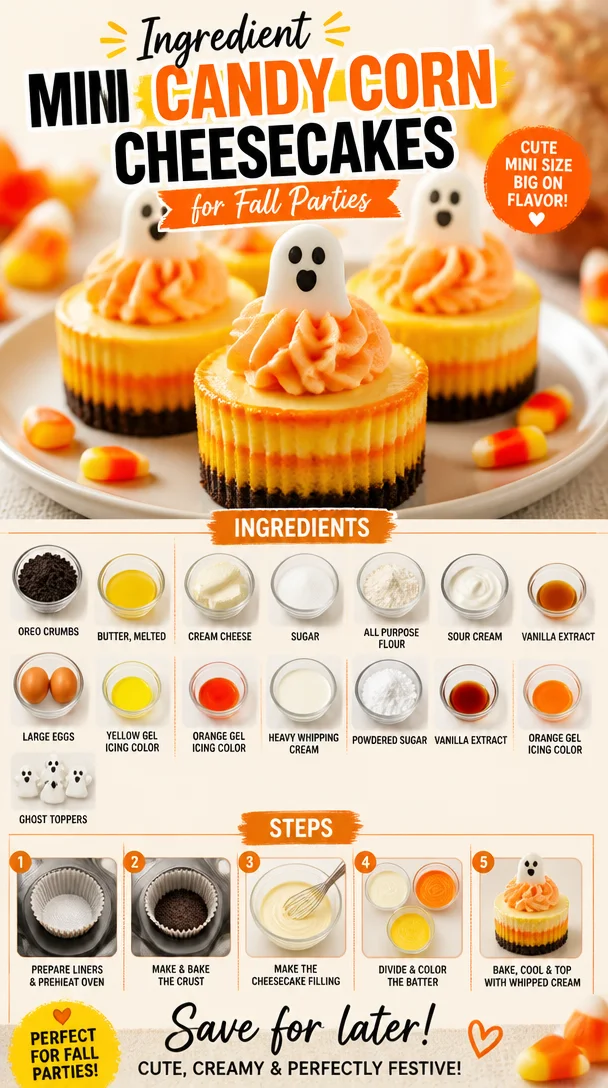
Mini Candy Corn Cheesecakes: A Sweet Halloween Treat
Ah, Halloween! It’s that magical time of year when the air turns crisp, pumpkins light up porches, and candy corn abounds. If you’re anything like me, you often find yourself caught up in the spirit of the season and, of course, the sweets that come along with it! This year, I’m excited to share a delightful recipe that’s not only cute but oh-so-delicious: Mini Candy Corn Cheesecakes. These little gems are the perfect treat for gatherings, spooky celebrations, or even just to indulge in all on your own (no judgement here!).
Imagine creamy cheesecake bliss layered with golden and orange hues, mimicking the classic candy corn. They’re super easy to make and will have everyone at your Halloween gathering reaching for seconds—or thirds! Plus, their mini size makes them just the right amount of sweet without overwhelming your taste buds. So, preheat your oven and let’s get to baking!
A Fond Memory with Cheesecake
Growing up, my family had a little tradition around Halloween. Every October, my aunt would host a cozy get-together filled with laughter, games, and, of course, a bevy of treats that celebrated all things fall. Among the sweet offerings, her decadent cheesecakes were always a standout. I fondly remember standing next to her in the kitchen, watching as she mixed the cream cheese with sugar and eggs, each swirl of the mixer creating a cloud of sweet anticipation.
One year, she decided to make mini cheesecakes decorated to look like Halloween favorites—pumpkins and candy corn, naturally! It was a huge hit, and I loved not only the taste but also the joy and togetherness it brought. Those moments spent with her in the kitchen taught me that baking isn’t just about the final product; it’s about creating memories and celebrating the joy of sharing delicious food with loved ones. Fast forward to today, and I’m thrilled to recreate that nostalgia with my Mini Candy Corn Cheesecakes!
Ingredients
Here’s what you’ll need to create these delightful treats:
-
1 1/2 cups (201g) Oreo crumbs
- You can use store-bought or crush your own Oreos. If you’re not a fan of Oreos, feel free to substitute with graham cracker crumbs for a milder flavor.
-
2 tbsp (41g) butter, melted
- This adds richness to your crust. For a non-dairy option, replace it with coconut oil or vegan butter.
-
12 ounces (339g) cream cheese, room temperature
- Ensure your cream cheese is softened for a smooth filling. Neufchâtel cheese is a great lower-fat substitute if you want a lighter option.
-
1/2 cup (104g) sugar
- Sweetening the deal! You could also use coconut sugar or a sugar substitute if you prefer.
-
2 tbsp (16g) all-purpose flour
- This helps thicken the cheesecake. For a gluten-free option, use almond flour or a gluten-free blend.
-
1/2 cup (115g) sour cream
- Adds a lovely tang! Plain yogurt works in a pinch, just be sure it’s thick.
-
1 1/2 tsp vanilla extract
- The star of many desserts! Use pure vanilla for the best flavor.
-
2 large eggs
- Bind everything together. For an egg-free version, you can replace each egg with a flax egg (1 tablespoon of flaxseed meal mixed with 2.5 tablespoons of water).
-
Yellow gel icing color
- Just a couple of drops for a vibrant hue. If you don’t have gel, use liquid food coloring but note the color may be less intense.
-
Orange gel icing color
- Same notes as above apply here for that perfect candy corn color.
-
1/2 cup (120ml) heavy whipping cream, cold
- This will be whipped for a topping; you can use chilled coconut cream for a dairy-free option.
-
5 tbsp (36g) powdered sugar
- This sweetens the whipped cream beautifully but can be omitted for a less sweet topping if desired.
-
1/2 tsp vanilla extract (for the whipped cream)
- A little extra flavor never hurts!
-
Orange gel icing color (for the whipped cream)
- Again, for that special candy corn vibe!
-
Ghost toppers
- These are fun decorations! You can find them in stores or make your own out of white chocolate or icing.
Step-by-Step Instructions
Let’s dive into the making of these sweet treats! It’s simpler than you’d think. Follow along with these steps for heavenly Mini Candy Corn Cheesecakes:
Step 1: Preheat the Oven
Start by preheating your oven to 325°F (163°C). This ensures your cheesecakes cook evenly and set perfectly. While that’s warming up, prepare your mini muffin tins with cupcake liners. They not only help with easy removal but also add a festive touch!
Step 2: Make the Crust
In a mixing bowl, combine the Oreo crumbs and melted butter until well mixed. The mixture should hold together when pressed. Just think of it as building the foundation of your cheesecake!
Chef’s tip: You can adjust the ratio based on your taste. If you enjoy a thicker crust, add a bit more butter.
Step 3: Press the Mixture
Using a tablespoon, scoop out the crumb mixture and press it firmly into each liner to create the crust. Get in there and make it nice and compact!
Chef hack: A shot glass works wonderfully for pressing the crust down evenly.
Step 4: Beat the Filling
In a large mixing bowl, using an electric mixer, beat the cream cheese until smooth and fluffy (about 2 minutes). Then, gradually add in the sugar and flour, mixing until combined.
Pro tip: Scrape down the sides a couple of times to ensure everything blends well!
Step 5: Add the Creamy Goodness
Now, add the sour cream and vanilla extract, mixing until well incorporated. Then, add the eggs—be careful not to overmix at this stage! Just blend until everything is combined, and it should be smooth and creamy.
Step 6: Color the Filling
Divide the cheesecake mixture evenly into two bowls. In the first bowl, add a few drops of yellow gel icing color. In the second bowl, add the orange gel icing color. Check the colors with a spatula and adjust until you achieve the desired hues!
Step 7: Layer it Up
Scoop about a tablespoon of the yellow cheesecake batter into each crust, followed by a dollop of orange batter on top. You want to fill them about 3/4 full, leaving some room for expansion.
Chef’s note: A two-tone effect looks stunning! Use a toothpick to swirl them together slightly for a marbled effect if you like.
Step 8: Bake and Chill
Place the minimuffin tin in the oven and bake for 18–20 minutes. You’ll know they’re ready when the edges are set, and the center has a slight jiggle. Once done, allow them to cool at room temperature for a bit, then transfer them to the fridge to set for at least 2 hours.
Step 9: Whip the Cream
Once your cheesecakes are set and you’re ready to top them, whip the heavy cream in a mixing bowl on high speed until it forms soft peaks. Gradually add the powdered sugar and the additional vanilla extract, continuing to beat until stiff peaks form. It should hold its shape nicely!
Step 10: Decorate
Using a piping bag or a simple Ziploc with a cut corner, pipe the whipped cream onto each cheesecake. Add a few drops of orange gel icing color to the top of each swirl and finish with your adorable ghost toppers.
Serving Suggestions
These mini candy corn cheesecakes are best served chilled. Arrange them on a festive platter adorned with mini pumpkins or Halloween decorations for a sweet display that will impress your friends and family. You can also drizzle some caramel sauce over the top for an extra indulgent touch—because who doesn’t love caramel?
Recipe Variations
Feel free to mix it up with these fun twists:
- Chocolate Lovers: Add some cocoa powder to the cheesecake mixture for chocolate-flavored cheesecakes.
- Fruit Fusion: Incorporate crushed fruit into the filling such as strawberries or raspberries for a fruity burst!
- No-Bake Option: Skip the baking; simply chill the filled crusts until firm for a creamy, no-bake cheesecake treat.
- Gluten-Free: Use gluten-free cookies for your crust and ensure the other ingredients are certified gluten-free.
- Mini Pumpkin Spice: Add pumpkin spice to the batter for a fall twist—a flavor combo that pairs beautifully with the candy corn theme.
Chef’s Notes
Over the years, I’ve experimented with many flavors and textures in cheesecakes, but nothing gets me quite as excited as layering colors to reflect the seasons. Watching these Mini Candy Corn Cheesecakes come together reminds me of my aunt’s traditions and how baking can be a wonderful way to honor memories while making new ones. Each time I bake these, I think back to those autumn gatherings and hope that these little treats bring similar joy and connection to your table!
FAQs and Troubleshooting
-
What if my cheesecake cracks?
Cracks can happen! To prevent this, ensure you don’t overmix the batter after adding the eggs and bake at a lower temperature to allow for gentle cooking. -
Can I make these ahead of time?
Absolutely! These cheesecakes can be made a day in advance. Just hold off on the whipped cream topping until you’re ready to serve. -
What if I can’t find ghost toppers?
No worries! You can use sprinkles or chocolate chips for decoration, or even whip up some mini ghosts from fondant. -
How do I store leftovers?
Keep any leftovers in an airtight container in the fridge for up to 3 days. They’re so good, they might not last that long!
Nutritional Info
While you’re indulging in these cheesecakes, remember to enjoy them in moderation! Each mini cheesecake contains approximately 150-200 calories, depending on your ingredient choices and serving sizes.
Now that you have all the tools to create these festive Mini Candy Corn Cheesecakes, it’s time to roll up those sleeves and get baking! I can’t wait to hear how they turn out and the sweet smiles they bring to your Halloween festivities. Happy baking, friends!
PrintMini Candy Corn Cheesecakes
Delightful mini cheesecakes layered in candy corn colors, perfect for Halloween gatherings.
- Prep Time: 30 minutes
- Cook Time: 20 minutes
- Total Time: 150 minutes
- Yield: 12 servings 1x
- Category: Dessert
- Method: Baking
- Cuisine: American
- Diet: Vegetarian
Ingredients
- 1 1/2 cups (201g) Oreo crumbs
- 2 tbsp (41g) butter, melted
- 12 ounces (339g) cream cheese, room temperature
- 1/2 cup (104g) sugar
- 2 tbsp (16g) all-purpose flour
- 1/2 cup (115g) sour cream
- 1 1/2 tsp vanilla extract
- 2 large eggs
- Yellow gel icing color
- Orange gel icing color
- 1/2 cup (120ml) heavy whipping cream, cold
- 5 tbsp (36g) powdered sugar
- 1/2 tsp vanilla extract (for the whipped cream)
- Orange gel icing color (for the whipped cream)
- Ghost toppers
Instructions
- Preheat the oven to 325°F (163°C) and prepare mini muffin tins with cupcake liners.
- Combine Oreo crumbs and melted butter in a mixing bowl until mixed well.
- Press the mixture into each liner to create the crust.
- Beat the cream cheese until smooth and fluffy, then gradually add sugar and flour.
- Add in the sour cream and vanilla extract, mixing until well incorporated, then blend in the eggs.
- Divide the mixture, tint one half yellow and the other half orange using gel icing color.
- Scoop yellow cheesecake batter into each crust, followed by a dollop of orange batter.
- Bake for 18-20 minutes until edges are set; allow to cool, then chill in the fridge for at least 2 hours.
- Whip the heavy cream with powdered sugar and extra vanilla extract until stiff peaks form.
- Pipe whipped cream onto each cheesecake and decorate with orange gel icing and ghost toppers.
Notes
For a non-dairy version, substitute butter with coconut oil and use coconut cream instead of heavy cream. Can be made a day in advance; just add the whipped cream before serving.
Nutrition
- Serving Size: 1 cheesecake
- Calories: 200
- Sugar: 10g
- Sodium: 200mg
- Fat: 14g
- Saturated Fat: 8g
- Unsaturated Fat: 4g
- Trans Fat: 0g
- Carbohydrates: 20g
- Fiber: 1g
- Protein: 3g
- Cholesterol: 45mg
Keywords: Halloween, cheesecake, desserts, sweet treats, mini desserts