
Indulge in Delight: Chocolate Covered Cherry Rice Krispies Treats
Welcome, fellow foodies! Today, we’re diving into a recipe that brings a bit of nostalgia and a whole lot of joy to the kitchen: Chocolate Covered Cherry Rice Krispies Treats. If you’re like me, there’s something magical about the combination of chocolate and cherries. It reminds me of carefree summer days, childhood treats, and the sweet satisfaction of creating something delicious from simple ingredients. So grab your apron, and let’s make some treats that will bring sweetness and smiles to your home!
The beauty of this recipe is not just in its taste but also in its vibrant colors and charming presentation. Imagine the crunchy texture of Rice Krispies coated in a luscious layer of chocolate, all while being infused with the delightful flavor of cherries. It’s a sweet, chewy, and slightly fruity take on a classic favorite that’s perfect for parties, gatherings, or even a cozy night in with your favorite movie. Let me show you how to create these scrumptious bites that will surely steal the spotlight!
A Sweet Memory: The Cherry-Picking Adventure
Growing up, I spent countless weekends at my grandparents’ farm, a treasure trove of memories wrapped in nature’s beauty. One of my favorite activities was cherry-picking. Armed with a little basket, I would wander through the orchard, my heart racing with the thrill of searching for those perfect gems. There was something special about plucking a cherry straight from the tree—its bright red hue beckoning me to take a bite.
Fresh cherries became a staple in our family desserts, often making their way into pies, tarts, and homemade jams. While those recipes hold a special place in my heart, this delightful combination of Rice Krispies and cherries carries a unique charm. It’s not just the memories of the cherries; it’s the laughter and love shared in the kitchen, the moments of creativity, and the joy of bringing everyone together. This recipe encapsulates that nostalgia and adds a modern twist, perfect for sharing with friends and family.
Ingredients: Gather Your Sweet Essentials
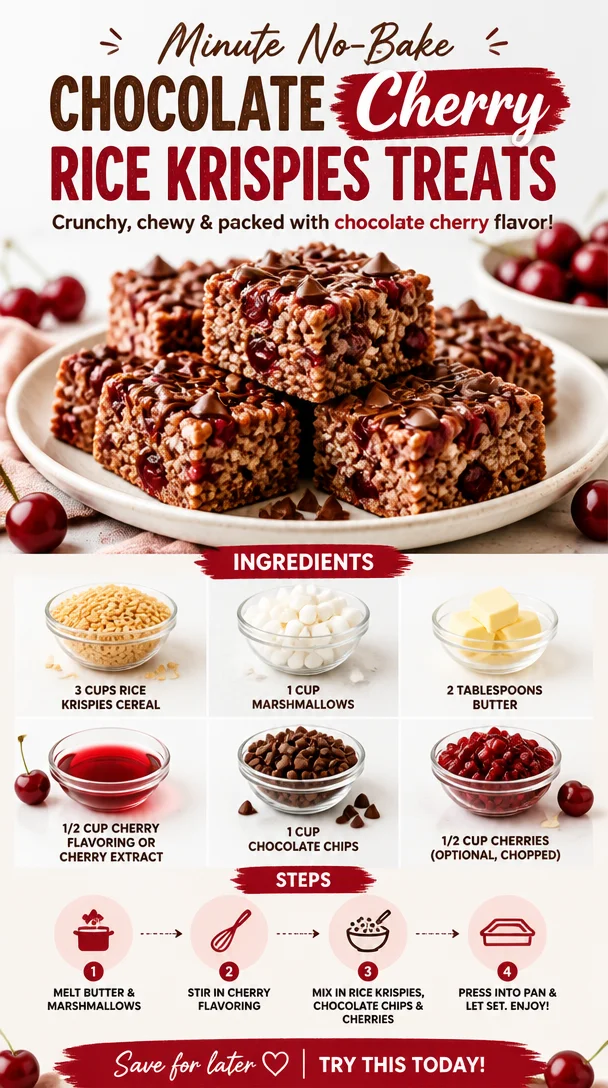
Before we plunge into making these delightful treats, let’s gather our ingredients, shall we? Here’s what you’ll need:
-
3 cups Rice Krispies cereal
The classic base for your treats, this cereal adds a delightful crunch. If you want to switch it up a bit, try using a flavored cereal for an added twist. -
1 cup marshmallows
The gooey magic that binds everything together! If you’re looking for a vegan alternative, consider using plant-based marshmallows available at several grocery stores. -
2 tablespoons butter
Adds richness and depth. For a dairy-free version, you can substitute with coconut oil or a vegan butter spread, which will impart a mild flavor. -
1/2 cup cherry flavoring or cherry extract
This is the star of the show and gives a beautiful cherry flavor to your treats. If you prefer a more natural version, use fresh cherry juice instead for a vibrant taste. -
1 cup chocolate chips
For that rich finish! You can choose dark, milk, or even white chocolate based on your personal cravings. Feel free to chop up a chocolate bar if you want larger chunks for an extra chocolatey experience. -
1/2 cup cherries (optional, chopped)
Fresh or canned cherries can add a juicy surprise in every bite, but if you’re feeling like a minimalist, skip this ingredient.
Chef Insight:
The true charm of this recipe lies in the balance of flavors. The crunchiness from the Rice Krispies, the sweetness from the marshmallows, and the rich indulgence from the chocolate come together to create a symphony of goodness. And don’t forget about those cherries—whether fresh or flavored, they add a wonderful brightness to the dish!
Step-by-Step Instructions: Let’s Bring These Treats to Life!
1. Prepare Your Equipment
To start off, gather your equipment. You’ll need a large bowl, a saucepan, a spatula or wooden spoon, and a greased 9×13 inch baking dish. Set the dish aside for later.
2. Melt the Butter
In your saucepan, melt the butter over low heat. Be patient and watch for it to fully melt to a golden, bubbly goodness. This step is crucial—burnt butter is no one’s friend, and it can ruin your delicious treats.
3. Add the Marshmallows
Once your butter is melted, add in the marshmallows. Stir continuously until the marshmallows are completely melted and combined with the butter, resulting in a gooey consistency. This will be the sticky glue that holds your Rice Krispies together, so make sure it’s a smooth blend!
4. Flavor it Up
At this point, we’ll introduce the cherry flavoring or extract into the mix. Stir it in until well combined. The aroma will transport you to cherry orchards in bloom! If you’re opting for fresh or canned cherries, add them now to ensure they are evenly distributed in the mixture.
5. Mix in the Rice Krispies
Remove the saucepan from the heat and gently fold in the Rice Krispies. Use your spatula to mix thoroughly; make sure each piece of cereal is coated with that delicious marshmallow mix. It’ll be a bit sticky—don’t worry, that’s exactly what we want!
6. Press into the Baking Dish
Transfer the mixture into your greased baking dish. With clean hands or a spatula, press down firmly until the mixture is evenly distributed and compact. The trick here is to press without crushing the cereal; we want that delightful crunch!
7. Melt the Chocolate
In a microwave-safe bowl, melt your chocolate chips—start with 30-second intervals, stirring in between until smooth and creamy. This step is key; you want to avoid burnt chocolate!
8. Cover with Chocolate
Pour the melted chocolate over your Rice Krispies mixture, using your spatula to ensure an even coating. It’s okay if some of the cereal peeks through—that charming rustic look adds to the homemade appeal!
9. Let it Set
Allow your creation to cool at room temperature for about 30 minutes to an hour. If you can’t wait, pop the dish in the refrigerator for quicker results!
10. Cut and Serve
Once set, cut them into squares or bars as you desire. Grab a plate, arrange those gorgeous treats, and they’re ready to share (or keep all to yourself)!
Chef Tip:
Use a pizza cutter for an effortless cutting experience, especially for larger batches. It makes this step feel effortless and can give you nice, even squares!
Serving Suggestions: A Feast for the Eyes
Presentation is key! Serve your Chocolate Covered Cherry Rice Krispies Treats on a beautiful platter or tiered cake stand. A sprinkle of extra chopped cherries or chocolate shavings on top can elevate their appearance, while a side of whipped cream or vanilla ice cream makes a delicious addition. Pairing these treats with a cup of hot cocoa or a light fruit tea can create a delightful tasting experience that your guests will rave about!
Recipe Variations: Get Creative!
If you’re adventurous in the kitchen, here are a few flavorful variations to make this treat your own:
-
Coconut Cherry Bliss: Add shredded coconut to the Rice Krispies mixture before pressing it into the baking dish. The tropical flavor complements the cherries beautifully!
-
Nutty Delight: Toss in a handful of chopped nuts (like pecans or almonds) for an added crunch and a more complex flavor, making it a treat for all the nut lovers out there.
-
Ice Cream Sandwich: Sandwich a thick slice of vanilla or cherry ice cream between two squares of your treats for a refreshing summer dessert.
-
Caramel Drizzle: Drizzle with caramel sauce over the chocolate layer for an extra indulgent experience.
-
Vegan/Fruit-Forward: Replace marshmallows with vegan alternatives and use fresh berries instead of cherries for a fruity twist that retains the spirit of the recipe!
Chef’s Notes: The Evolution of a Sweet Classic
Over the years, I’ve discovered that these treats are endlessly adaptable. What began as a simple Rice Krispies recipe has evolved into a canvas for creativity. The summer when I stumbled upon cherry extract led me to a delightful flavor explosion, sparking my imagination. Simple tweaks, like incorporating lemon zest or replacing chocolate with peanut butter, have created a recipe that keeps on giving!
Plus, there’s a certain joy in sharing these with others. Watching friends’ eyes light up when they take that first bite ignites the same giddy excitement I felt as a child picking fresh cherries.
FAQs and Troubleshooting: Your Baking Questions Answered
1. My treats are too sticky—what went wrong?
This often happens if the marshmallows weren’t melted enough or if too much butter was used. Make sure to melt the marshmallows thoroughly before mixing in the Rice Krispies, and try adjusting the butter if needed.
2. They didn’t set up properly.
Make sure to give the treats enough time to cool and set, especially if you put them in the refrigerator. If they’re still too gooey, you might increase the ratio of Rice Krispies next time.
3. How do I store these treats?
Store your treats in an airtight container at room temperature for up to a week. You can also freeze them if you want to save some for later—just wrap them individually in plastic wrap and place them in a freezer-safe container.
4. Can I substitute ingredients?
Absolutely! Feel free to experiment with different cereals, flavorings, and toppings! Just keep in mind that some substitutions may alter the texture slightly.
Nutritional Info (Optional)
If you’d like specific nutritional information based on portion sizes, it’s best to use a nutrition calculator or app for precise details tailored to your personal servings.
So, there you have it! A delightful recipe that combines sweet nostalgia with delicious flavors. I hope you enjoy creating and sharing these Chocolate Covered Cherry Rice Krispies Treats as much as I do. Happy baking, my friends, and remember to savor every moment in the kitchen!
PrintChocolate Covered Cherry Rice Krispies Treats
Delight in these crunchy and chewy treats, infused with cherry flavor and topped with rich chocolate.
- Prep Time: 15 minutes
- Cook Time: 15 minutes
- Total Time: 30 minutes
- Yield: 12 servings 1x
- Category: Dessert
- Method: No-Bake
- Cuisine: American
- Diet: Vegetarian
Ingredients
- 3 cups Rice Krispies cereal
- 1 cup marshmallows
- 2 tablespoons butter
- 1/2 cup cherry flavoring or cherry extract
- 1 cup chocolate chips
- 1/2 cup cherries (optional, chopped)
Instructions
- Prepare your equipment: Gather a large bowl, saucepan, spatula, and a greased 9×13 inch baking dish.
- Melt the butter over low heat in the saucepan.
- Add the marshmallows and stir until melted and combined with the butter.
- Flavor the mixture by adding cherry flavoring or extract.
- Mix in the Rice Krispies, ensuring each piece is coated.
- Press the mixture into the greased baking dish evenly.
- Melt the chocolate chips in a microwave-safe bowl in 30-second intervals.
- Cover the Rice Krispies mixture with the melted chocolate.
- Let it cool at room temperature for about 30 minutes to an hour.
- Cut into squares or bars and serve.
Notes
Store treats in an airtight container at room temperature for up to a week or freeze individually wrapped for later.
Nutrition
- Serving Size: 1 square
- Calories: 200
- Sugar: 14g
- Sodium: 60mg
- Fat: 8g
- Saturated Fat: 4g
- Unsaturated Fat: 4g
- Trans Fat: 0g
- Carbohydrates: 30g
- Fiber: 0g
- Protein: 1g
- Cholesterol: 10mg
Keywords: Rice Krispies, dessert, chocolate, cherry, no-bake