
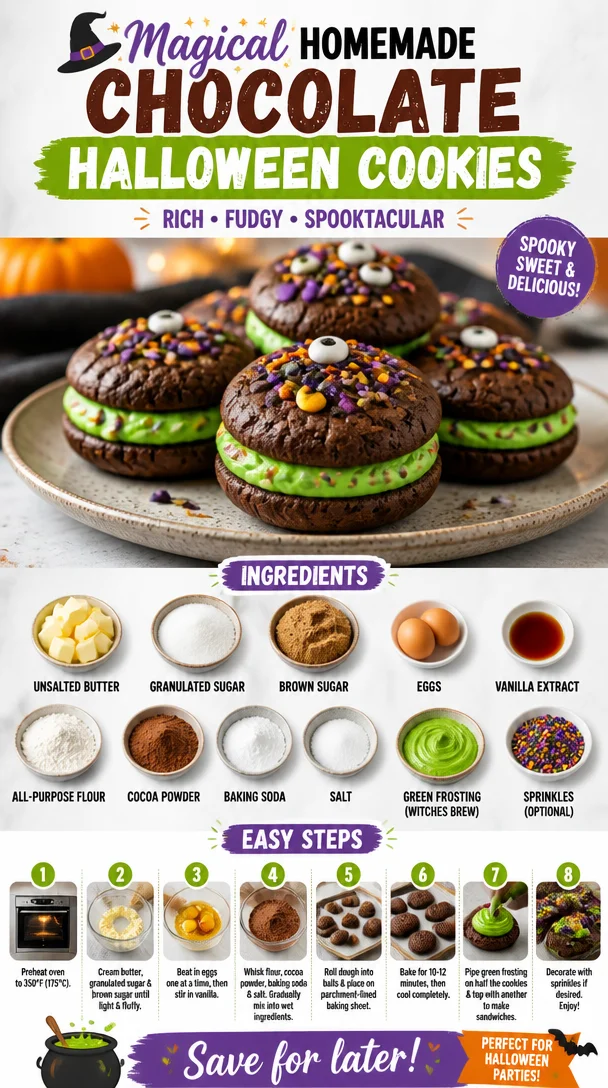
Magical Homemade Chocolate Halloween Cookies
As the crisp autumn air settles in and the leaves begin to swirl in shades of orange and gold, something undeniable happens in the kitchen. The scent of warm spices wafts through the air, and the spirit of Halloween begins to creep in. It’s that magical time of year when we’re not just baking treats; we’re crafting memories, sharing laughs, and creating something that feels like home—and nothing embodies that more than my Magical Homemade Chocolate Halloween Cookies.
Imagine this: the doorbell rings, and neighborhood kids zoom by in flashy costumes, their laughter echoing down the street. You’re cozied up in your kitchen, apron on, ready to create something sweet. That’s where these cookies come in! Dense, fudgy, and filled with a surprise of vibrant green frosting that resembles a witch’s brew, these cookies are a playful twist on a classic favorite. They’re not just delicious; they’re sure to get everyone in the Halloween spirit!
A Personal Story: Baking with Grandma
Growing up, Halloween was a cherished holiday in my family, mainly because it was also baking season! My favorite memories are of spending afternoons with my grandmother in her bustling kitchen, where she transformed simple ingredients into seasonal delights. One October afternoon, she introduced me to the intricate world of cookie decorating. An impressive spread of cookies adorned the countertop—ghosts, pumpkins, and witches—each one a tapestry of frosting and sprinkles.
As we mixed the dough, she shared stories of her own childhood Halloweens, the excitement in her eyes mirroring the pumpkin orange swirling in the batter. The highlight was always the frosting! There was nothing like slathering on the vibrant colors and watching those cookies come to life.
Now, every time I bake these Magical Chocolate Halloween Cookies, I’m transported back to those treasured afternoons, where laughter, creativity, and just a bit of mess were the order of the day. I hope they bring you as much joy as they did for me. Let’s dive right into this fun and spooky baking adventure!
Ingredients
-
1 cup unsalted butter, softened: Butter is the base of our cookies, lending richness and depth of flavor. If you’re looking for a lower-fat option, consider using a half-cup of applesauce or a stick of margarine, but remember that this may alter the taste slightly.
-
1 cup granulated sugar: This sweetener helps create that chewy texture we’re after. You can use coconut sugar for a more caramel-like flavor, but the color of your dough will change.
-
1 cup brown sugar, packed: Brown sugar adds a wonderful moistness to your cookies, enhancing both flavor and texture. If you only have granulated sugar on hand, you can make your own brown sugar by mixing granulated sugar with a tablespoon of molasses!
-
2 large eggs: Binding agents like eggs add moisture and richness. For a vegan alternative, use flax eggs (1 tablespoon ground flaxseed mixed with 2.5 tablespoons water).
-
2 teaspoons vanilla extract: This classic flavor enhances the richness of our chocolate cookies. Select pure vanilla extract for the best flavor, but if you’re in a pinch, imitation vanilla will work, too.
-
3 cups all-purpose flour: Creating structure in your cookies, all-purpose flour is a kitchen staple. If you’re gluten-free, use a 1:1 gluten-free flour blend for similar results.
-
3/4 cup cocoa powder: This is where the magic happens! Chocolatey richness in every bite. Dutch-process cocoa gives a deeper flavor, but feel free to use natural cocoa for a lighter touch.
-
1 teaspoon baking soda: This helps our cookies rise just right, creating that chewy texture. Don’t substitute it with baking powder here, as it alters the chemical balance.
-
1/2 teaspoon salt: A dash of salt enhances the sweetness and balances the flavors. Always use kosher or sea salt for a touch of sophistication.
-
1 cup green frosting (witches brew) for filling: This spooky surprise will ooze out when you take a bite! Feel free to make your own or grab a tub of buttercream frosting.
-
Sprinkles for decoration (optional): These are the finishing touches that create festive flair! Use any seasonal sprinkle mix you like—think orange, black, and purple!
Step-by-Step Instructions
-
Preheat your oven: Start by preheating your oven to 350°F (175°C). Preheating is essential for even baking and helps set the right texture.
-
Cream the butter and sugars: In a large bowl, combine the softened unsalted butter, granulated sugar, and packed brown sugar. Using an electric mixer, cream them together on medium speed until light and fluffy—about 2 to 3 minutes. This process is vital; it incorporates air into the butter, helping our cookies rise beautifully!
-
Add eggs and vanilla: Crack in the eggs, one at a time, mixing well after each addition. Add the vanilla extract and continue mixing until fully combined. Your mixture should look smooth and glossy at this point.
-
Prepare the dry ingredients: In a separate bowl, whisk together the all-purpose flour, cocoa powder, baking soda, and salt. This step ensures that all the dry ingredients are evenly distributed, preventing any dry pockets in your dough.
-
Combine wet and dry mixtures: Gradually add the dry ingredients to the wet mixture, mixing on low speed until just combined. Be careful not to overmix; we want fluffy cookies, not tough ones!
-
Shape the cookies: Using a cookie scoop or your hands, shape the dough into balls about 1 tablespoon in size. Place them onto a lined baking sheet, spaced about 2 inches apart. Don’t worry about the shape; they’ll spread a bit during baking.
-
Create wells for the filling: Gently press your thumb in the center of each cookie ball to create a small well. This is where the witches brew will go!
-
Fill with frosting: Spoon a small dollop of green frosting into each cookie well. Don’t be shy—this is the magic inside!
-
Bake to perfection: Place the baking sheet in your preheated oven and bake for 10-12 minutes, or until the edges appear set, but the centers are still soft. They’ll continue to cook on the hot baking sheet after you take them out.
-
Cool and decorate: Allow the cookies to cool on the baking sheet for a few minutes before transferring them to a cooling rack. Once cool, feel free to sprinkle some festive sprinkles on top for that extra Halloween spirit!
Serving Suggestions
These Magical Halloween Cookies are best enjoyed fresh out of the oven, but they also hold well for days in an airtight container. For added festive flair, plate them on a themed serving tray, perhaps surrounded by mini pumpkins or ghostly decorations. Pair them with a glass of cold milk, hot cocoa, or a spooky Halloween punch for a complete treat experience!
Recipe Variations
-
Add-ins: Mix in chocolate chips or crushed candy bars for an even more delectable treat. Mini marshmallows also add a fun surprise.
-
Flavor Twists: Try using orange extract instead of vanilla for a citrusy kick that pairs perfectly with the cocoa.
-
Garnish Ideas: Top with edible glitter or glow-in-the-dark sprinkles to make your cookies pop!
-
Sugar Substitutes: For a healthier option, swap half of the granulated sugar with monk fruit sweetener for fewer calories.
-
Stuffed Cookies: Instead of filling them with frosting, try stuffing them with caramel or Nutella for a gooey center!
Chef’s Notes
What I love most about these cookies is that they carry a sense of nostalgia while inviting your creativity in the kitchen. Over the years, I’ve experimented with numerous flavors and fillings, but they consistently remind me of Grandma’s kitchen. Baking these cookies is like taking a trip down memory lane, reminding me of that wonderful magic that happens when love and ingredients collide.
Wrap them snugly and share them with friends, or enjoy them solo with a cozy blanket and a good book. Life is all about savoring these moments, and these cookies help make those moments even sweeter!
FAQs and Troubleshooting
1. Why are my cookies flat?
If your cookies come out flat, it might be due to overmixing the dough or using cold butter. Ensure your butter is softened but not melted, and mix just until combined.
2. Can I use baking powder instead of baking soda?
While both leaveners help baked goods rise, they work differently. Stick to baking soda for this recipe to achieve the desired chewy texture.
3. How do I store the cookies?
Store your cookies in an airtight container at room temperature for up to a week. To keep them fresher for longer, you can refrigerate them!
4. Can I freeze these cookies?
Absolutely! You can freeze the raw dough balls for up to three months. Just let them thaw before baking, or bake them straight from the freezer, adding a minute or two to the cooking time.
Nutritional Info
While I won’t dive deep into numbers, it’s safe to say these cookies bring a whole lot of joy! Enjoy them as an occasional treat while embracing the fun of baking and sharing during this special time of year.
So, are you ready to create some kitchen magic this Halloween? Gather your ingredients, roll up your sleeves, and let’s whip up a batch of these Magical Homemade Chocolate Halloween Cookies that will surely leave everyone enchanted. Happy baking!
PrintMagical Homemade Chocolate Halloween Cookies
Delicious, fudgy cookies filled with vibrant green frosting that brings the spirit of Halloween to life.
- Prep Time: 15 minutes
- Cook Time: 12 minutes
- Total Time: 27 minutes
- Yield: 24 servings 1x
- Category: Dessert
- Method: Baking
- Cuisine: American
- Diet: Vegetarian
Ingredients
- 1 cup unsalted butter, softened
- 1 cup granulated sugar
- 1 cup brown sugar, packed
- 2 large eggs
- 2 teaspoons vanilla extract
- 3 cups all-purpose flour
- 3/4 cup cocoa powder
- 1 teaspoon baking soda
- 1/2 teaspoon salt
- 1 cup green frosting (witches brew) for filling
- Sprinkles for decoration (optional)
Instructions
- Preheat your oven to 350°F (175°C).
- Cream the butter and sugars together until light and fluffy.
- Add the eggs one at a time, along with vanilla extract, mixing until smooth.
- Prepare the dry ingredients by whisking flour, cocoa powder, baking soda, and salt in a separate bowl.
- Combine the dry ingredients with the wet mixture gradually, mixing on low speed.
- Shape the dough into balls about 1 tablespoon in size and place on a baking sheet.
- Create wells in the center of each dough ball for the frosting.
- Fill the wells with green frosting.
- Bake for 10-12 minutes until edges are set.
- Cool the cookies before transferring them to a cooling rack, and decorate with sprinkles if desired.
Notes
These cookies are best enjoyed fresh out of the oven but can be stored in an airtight container for several days.
Nutrition
- Serving Size: 1 cookie
- Calories: 180
- Sugar: 10g
- Sodium: 150mg
- Fat: 8g
- Saturated Fat: 4g
- Unsaturated Fat: 3g
- Trans Fat: 0g
- Carbohydrates: 24g
- Fiber: 1g
- Protein: 2g
- Cholesterol: 30mg
Keywords: Halloween cookies, chocolate cookies, spooky treats