
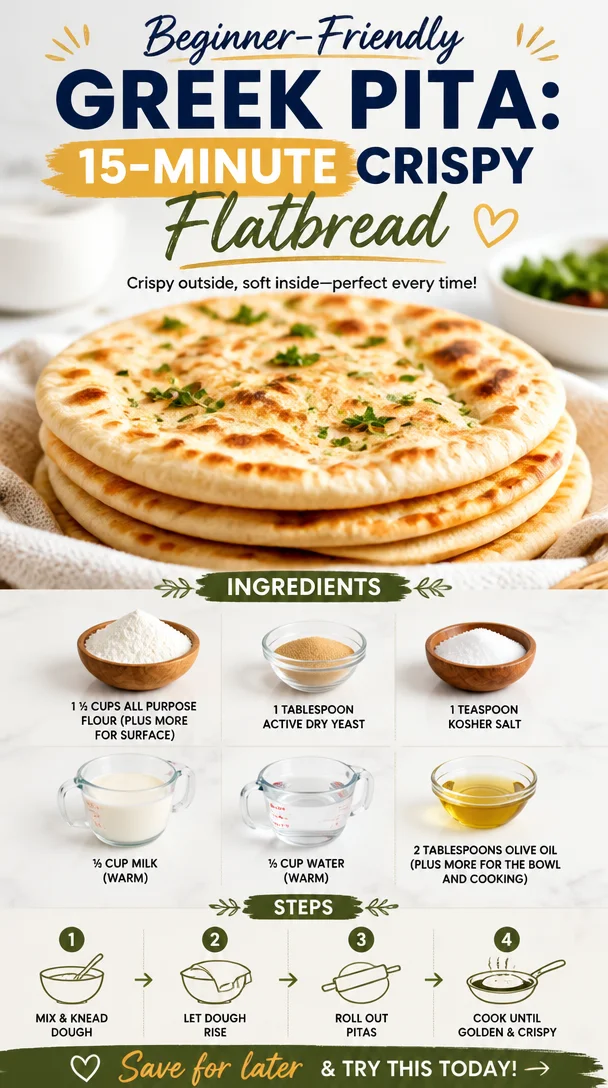
Best Ever Greek Pita Recipe
Introduction
Hello, darling bakers! Today, I’m thrilled to share with you one of my all-time favorite recipes: Best Ever Greek Pita! Imagine soft, pillowy pitas fresh from the oven—perfect for scooping up dips, stuffing with your favorite fillings, or enjoying warm with a drizzle of olive oil. They’re a staple in Mediterranean kitchens, and trust me, once you try them at home, you’ll never want to go back to store-bought.
Baking pita bread might sound intimidating, but it’s actually straightforward and so satisfying. The joy begins with just a few simple ingredients; it’s all about the process of transforming them into something magical. Each bite of a homemade pita feels like a warm hug, bringing comfort and a taste of nostalgia. Making these pitas takes me back to my childhood summers spent in the kitchen with family, where the scent of baked bread would fill the air, drawing everyone together.
Our cozy family gatherings often featured homemade dips like tzatziki or hummus, and you could always find a warm pita right in the middle of the table. Who could resist tearing into that soft bread, stuffing it with fresh veggies and savory fillings? I’m sure that if you knew how easy it was to bring this tradition into your home, you’d be as eager as I am to whip up a batch.
So let’s gather our ingredients, roll up our sleeves, and dive into making the best Greek pita that’s not just easy but also a fun experience! Stick with me, and before you know it, you’ll have a fluffy stack of pitas ready to serve!
Personal Story
One of my fondest memories is of my grandmother’s kitchen, a tiny space chock-full of love and laughter. She had this old, wooden table where she’d roll out dough for her famous pitas and breads, and we’d all gather around, eager to help with the simple task of shaping the dough. I remember her gentle hands working the flour, a sprinkle of which would often find its way onto my nose, much to everyone’s amusement.
As she demonstrated the perfect way to flatten the dough into rounds, I was entranced by the way a few fingers could turn a sticky mass into a smooth, supple disc. The alluring aroma of baking bread was always irresistible, drawing us in like a comforting blanket. We’d eagerly await the moment she pulled those pitas from the oven, steam wafting into the air, filling it with warmth and love. Each bite was accompanied by stories of her childhood in Greece, where bread was an everyday requirement—simple yet divine.
Making pita now brings me the same joy. Every time I knead the dough and feel it begin to come together, it’s like a time machine transporting me back. I hope that when you make these pitas, you can capture a piece of that magic and create lasting memories in your own kitchen!
Ingredients
-
1 ½ cups all-purpose flour (plus more for surface)
This is the backbone of your pita. All-purpose flour gives the bread a lovely chewiness. For a whole grain twist, you can substitute half of this with whole wheat flour, which will add a nutty flavor. -
1 tablespoon active dry yeast
This little powerhouse helps the dough rise, creating those lovely air pockets that make your pita fluffy. If you don’t have active dry yeast, you can use instant yeast in the same quantity—no need to proof. -
1 teaspoon kosher salt
Salt not only enhances the flavor but also strengthens the gluten structure of the dough, giving the pita that perfect texture. -
⅓ cup warm milk
The warmth of the milk helps to activate the yeast. If dairy-free is your game, go ahead and use almond or oat milk; just make sure it’s warm, not hot! -
⅓ cup warm water
Like the milk, warm water activates the yeast. Keep it around 110°F to ensure the yeast thrives. If you want a little extra flavor, try using vegetable broth instead! -
2 tablespoons olive oil (plus more for the bowl and cooking)
Olive oil adds richness and a beautiful flavor; it helps keep the pitas soft. You could use melted coconut oil or avocado oil if you’re looking for alternatives.
Step-by-Step Instructions
-
Activate the Yeast
In a small bowl, combine warm water, warm milk, and yeast. Let it sit for about 5–10 minutes until it’s foamy. This means your yeast is alive and ready to work its magic!Chef tip: Ensure your liquids aren’t too hot; otherwise, you’ll risk killing your yeast. Just warm to the touch is perfect!
-
Mix the Dry Ingredients
In a large mixing bowl, whisk together the flour and kosher salt. Create a little well in the center, which is where the magic will happen!Tip: Always measure your flour properly. Spoon it into your measuring cup and level it off for accuracy. A scale can also be your best friend in baking!
-
Combine
Pour your foamy yeast mixture into the well in your dry ingredients, along with the olive oil. Mix with a wooden spoon or your hands until it comes together into a shaggy dough.Hack: If the dough feels too sticky, don’t panic! A little extra flour will help you along the way. Remember, you want a slightly tacky dough, but it shouldn’t be sticky.
-
Knead the Dough
Transfer your dough to a well-floured surface. Knead for about 5–7 minutes until the dough is smooth and elastic. You may even find it therapeutic—trust me!Tip: If you’re new to kneading, think of it like a mini workout for your hands. Use the palms and really press down, then fold over and repeat.
-
First Rise
Grease a clean bowl with olive oil, place your dough inside, and cover it with a clean towel. Let it rise in a warm place for about 1 hour or until it doubles in size.Chef story: I always put my dough near the oven while it’s preheating—for me, this is the best spot for dough to rise nicely.
-
Shape the Pitas
After the dough has risen, punch it down gently to release the air. Divide it into about 6 equal pieces, shaping each into a ball. Let the dough rest for about 10 minutes covered with a towel.Tip: Resting the dough helps relax the gluten, making shaping easier.
-
Roll Them Out
On a lightly floured surface, roll each ball into a circle about ¼ inch thick. Dust lightly with flour as needed to prevent sticking.A little secret: Make sure your rolling pin is floured too; it helps it glide smoothly over the dough!
-
Cook the Pitas
Preheat a non-stick skillet or cast-iron pan over medium-high heat. Cook each dough circle one at a time for about 2-3 minutes on one side, until it starts to puff and brown lightly. Then flip and cook for another minute or two. Transfer to a plate and cover with a kitchen towel to keep warm.Pro tip: You’re looking for those beautiful bubbles in the pitas! If they’re not puffing, the heat might be too low. Adjust accordingly.
-
Serve and Enjoy!
Once done, serve your pitas warm with your favorite dips or fillings!
Serving Suggestions
Your homemade Greek pitas are like little canvases waiting to be painted with flavor! Whether you tear them apart to scoop up creamy hummus, fill them with shawarma, or stuff them with fresh veggies and feta cheese, the possibilities are endless. Consider a garnish of fresh herbs like parsley or mint to elevate every bite. Bonus points if you drizzle them with some extra virgin olive oil for added flavor! You can also toast any leftover pitas for a lovely crispy treat.
Recipe Variations
-
Herbed Pitas: Add a teaspoon of dried oregano or thyme to the dough for an aromatic twist!
-
Whole Wheat Option: Substitute half of the all-purpose flour with whole wheat flour for a hearty flavor and additional fiber.
-
Spicy Pitas: Incorporate a pinch of red pepper flakes or smoked paprika into the dough for a hint of heat.
-
Garlic Infusion: Mix in some finely minced garlic for a fragrant touch that pairs beautifully with Mediterranean dishes.
-
Stuffed Pitas: Feel free to stuff these pitas with cooked meat, veggies, or cheese before baking for a delicious surprise!
Chef’s Notes
Making pitas has been a journey of learning and delicious experimentation for me. The first time I attempted them, I ended up with some rather sad, deflated attempts. But don’t let one mishap discourage you! Every baker has that story, and with practice, you will refine your skills. Over time, I’ve come to enjoy the rhythm of kneading and watching the dough rise. It’s like a dance in the kitchen—each step brings you closer to something beautiful! And let’s be honest, I still have my flour fights with friends from time to time, and that’s part of the fun!
FAQs and Troubleshooting
1. My pitas didn’t puff! What went wrong?
It might be that the skillet wasn’t hot enough. You need a nice high temperature for them to puff properly. Also, make sure they’re rolled out evenly without too much pressure.
2. Can I store these pitas?
Absolutely! Allow them to cool completely, then store them in an airtight container or a zip-top bag for up to a week in the fridge. You can also freeze them for up to three months—just reheat them in a skillet or oven when you’re ready to enjoy!
3. What if my dough is too sticky?
Don’t worry! Gradually add a little more flour until you can handle it comfortably. Just be cautious, as too much flour can lead to tough pitas.
4. Can I make these ahead of time?
Sure! You can prepare the dough and let it rise, then punch it down and refrigerate it for up to 24 hours before shaping and cooking. Just allow it to come to room temperature before rolling out.
Nutritional Info (per pita, approx.)
- Calories: 120
- Carbohydrates: 25g
- Protein: 3g
- Fat: 2g
- Fiber: 1g
The joy of baking is in the journey as much as the destination. So, tie on that apron, invite a friend (or two!), and kick off your adventure in making the best Greek pita. Happy baking, friends! 🌟
PrintBest Ever Greek Pita Recipe
Soft, pillowy pitas perfect for scooping dips or stuffing with fillings, inspired by Mediterranean traditions.
- Prep Time: 15 minutes
- Cook Time: 10 minutes
- Total Time: 25 minutes
- Yield: 6 pitas 1x
- Category: Bread
- Method: Baking
- Cuisine: Mediterranean
- Diet: Vegetarian
Ingredients
- 1 ½ cups all-purpose flour (plus more for surface)
- 1 tablespoon active dry yeast
- 1 teaspoon kosher salt
- ⅓ cup warm milk
- ⅓ cup warm water
- 2 tablespoons olive oil (plus more for the bowl and cooking)
Instructions
- Activate the yeast: In a small bowl, combine warm water, warm milk, and yeast. Let it sit for about 5–10 minutes until it’s foamy.
- Mix the dry ingredients: In a large mixing bowl, whisk together the flour and kosher salt.
- Combine: Pour your foamy yeast mixture into the well in your dry ingredients, along with the olive oil. Mix until it comes together into a shaggy dough.
- Knead the dough: Transfer your dough to a well-floured surface. Knead for about 5–7 minutes until the dough is smooth and elastic.
- First rise: Grease a clean bowl with olive oil, place your dough inside, and cover with a clean towel. Let it rise for about 1 hour or until it doubles in size.
- Shape the pitas: After the dough has risen, punch it down gently, divide it into about 6 equal pieces, and shape each into a ball. Let the dough rest for about 10 minutes.
- Roll them out: On a lightly floured surface, roll each ball into a circle about ¼ inch thick.
- Cook the pitas: Preheat a non-stick skillet or cast-iron pan over medium-high heat. Cook each dough circle for about 2-3 minutes on one side, then flip and cook for another minute or two.
- Serve and enjoy: Once done, serve your pitas warm with your favorite dips or fillings!
Notes
Be sure to roll the pitas evenly for the best results. Leftover pitas can be stored in an airtight container for up to a week.
Nutrition
- Serving Size: 1 pita
- Calories: 120
- Sugar: 0g
- Sodium: 400mg
- Fat: 2g
- Saturated Fat: 0g
- Unsaturated Fat: 2g
- Trans Fat: 0g
- Carbohydrates: 25g
- Fiber: 1g
- Protein: 3g
- Cholesterol: 0mg
Keywords: Greek pita, Mediterranean bread, homemade pita, baking, vegetarian recipe