
Preserving the Taste of Fall: A Cozy Guide to Apple Preserving
Ah, autumn! The vibrant hues of orange, crimson, and gold paint our landscapes, while the crisp air beckons us to cozy up in the kitchen. For many, this season has a magical quality; it brings back memories of jumping in piles of leaves or sipping cider on a brisk afternoon. But for me, fall means one delicious thing: apples! And what better way to celebrate this bountiful fruit than by preserving it, capturing its essence to enjoy long after the leaves have fallen?
Imagine hazy afternoons spent canning with family, the sweet aroma of apples simmering on the stove, and the clinking of jars echoing from the counter. It’s more than just a culinary task; it’s an experience rooted in tradition, connection, and warmth. And you, my friend, can become a part of that tradition right in your own kitchen!
Throughout this blog post, we’ll dive into the delightful world of apple preserving. We’ll explore easy, step-by-step instructions to create your very own apple preserves, perfect for jams, toppings, or simply savoring on warm toast. I’m here to guide you through the process, ensuring that you not only create something extraordinary but also enjoy every minute of it.
Let’s grab those apples and get started—your kitchen’s about to smell like the essence of autumn!
A Sweet Memory
I remember the first time I ever went apple picking. My family decided to make it a yearly tradition, and I was filled with excitement! We drove out to a quaint farm, surrounded by towering trees heavy with glistening apples. I can still picture the sun shining brightly and the sound of laughter filling the air as we filled our baskets to the brim with apples of every shape and size.
That evening, Mom set us up at the kitchen table with a huge bowl of freshly picked apples. The air turned sweet and fragrant as she showed us how to peel and chop them. We shared stories, added whispers of cinnamon, and sampled bits right off the cutting board. The noise of our chatter blended with the bubbling of the preserves on the stove, creating our very own symphony of autumn.
In that moment, I realized that cooking is not just about the food; it’s about sharing memories, laughter, and love. Those apple preserves we made were not only delicious; they were a testament to time spent together. Fast forward to today, and I find joy in recreating those moments while teaching others how to do the same. It’s this heartfelt sentiment that inspires me to share this apple preserving guide with all of you!
Ingredients
Before we dive into the preserving magic, let’s gather our ingredients. You’ll need the following:
-
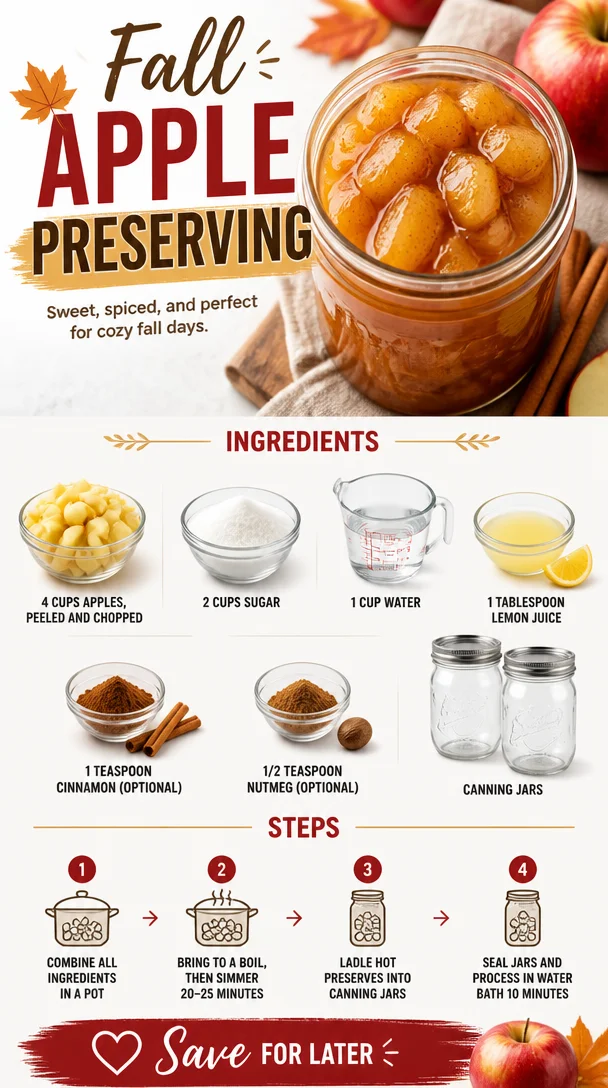
4 cups apples, peeled and chopped
Fresh apples are the star of our show. Choose your favorites—Granny Smith for tartness or Honeycrisp for sweetness. You can mix varieties for a complex flavor profile. -
2 cups sugar
Sugar acts as a preservative and sweetener. You can use granulated sugar or substitute with honey or maple syrup, adjusting the quantity to your taste. -
1 cup water
Essential for helping the apples soften and meld with sugar, creating that luscious syrup. You could also use apple juice for an extra fruity kick! -
1 tablespoon lemon juice
This is crucial for balancing flavors and preserving the beautiful color of your apples. If you’re out of fresh lemons, bottled lemon juice works too. -
1 teaspoon cinnamon (optional)
Warm, fragrant notes add a lovely depth to your preserves. If you’re feeling adventurous, consider using a pinch of cardamom or ginger for an exciting twist! -
1/2 teaspoon nutmeg (optional)
This will enhance the warmth of the preserves. Feel free to omit it if nutmeg isn’t your thing! -
Canning jars
Make sure they’re clean and sterilized, ready to hold your delicious apple preserves. Don’t forget the lids!
Step-by-Step Instructions
Ready to get cooking? Let’s ensure your kitchen is filled with the heavenly aroma of preserved apples!
-
Prep Your Apples
Start by peeling your apples. Grab a trusty paring knife, or if you’re like me, use a vegetable peeler for speed! Core the apples and chop them into bite-sized pieces. The size doesn’t have to be perfect—rustic adds charm! -
Mixing It Up
In a large pot, combine your chopped apples, sugar, and water. Give it a good stir to ensure all the ingredients are well incorporated. If you’re adding cinnamon and nutmeg, sprinkle them in now. Let this mixture sit for about 15 minutes. This allows the apples to release their natural juices, helping the sugar dissolve. -
Cook and Bubble
Place the pot over medium heat and bring the mixture to a gentle simmer. As the apples soften, you’ll see them transform into a golden, syrupy concoction. Stir occasionally to prevent sticking and keep the apples from cooking unevenly. If you have a potato masher at hand, give it a few gentle mashes to break down the apples and make the spread smoother, if desired. -
Testing for Doneness
After about 20-30 minutes of simmering, you’ll want to check the consistency. Use a spoon to drop a bit of the mixture onto a plate. Let it sit for a minute, then run your finger through it. If it holds its shape, bingo! If it’s still too runny, continue to cook it down for another 5-10 minutes. -
Canning Time
Once you’re satisfied with the texture, remove the pot from heat. Carefully ladle the hot apple preserve into your sterilized canning jars. Leave about half an inch of headspace at the top, and wipe any spills from the jar rims. Place the lids on and screw on the bands until they are fingertip-tight. -
Water Bath Canning
To seal the jars properly, you’ll need to process them in a water bath. Fill a large pot with enough water to cover the jars by about an inch. Bring it to a rolling boil, then carefully lower the jars into the pot. Secure the lid on the pot and process for about 10 minutes. When the time’s up, carefully remove the jars and let them cool on a kitchen towel. -
Listen for the Pop
As your jars cool, listen for that delightful “pop” sound. It’s music to a canner’s ears! It means your jars are sealing properly. Once cool, test the seals by pressing down the center of each lid. If it springs back, it’s not sealed—no worries. Just refrigerate and enjoy within a week.
Serving Suggestions
Your homemade apple preserves are not only perfect on toast or pancakes; they can add a juicy kick to various dishes! Spread them over a warm scone, dollop a spoonful on top of yogurt, or use them as a filling for pastries. The possibilities are endless, and trust me, they’ll brighten up any meal!
Recipe Variations
-
Spicy Apple Preserves
Add a pinch of cayenne pepper or some finely chopped chili to the pot to give your preserves a delightful kick! -
Vanilla-Infused Preserves
Toss in a split vanilla bean or some pure vanilla extract for a fragrant, creamy essence. -
Cran-Apple Twist
Mix in a cup of fresh or dried cranberries for a beautifully tart flavor balance. -
Almond Joy
Stir in a few dollops of almond extract for a nutty sweetness that pairs beautifully with apples. -
Herbal Infusion
Add fresh thyme or rosemary during cooking for a lovely herbaceous note, ideal for savory dishes!
Chef’s Notes
I can’t help but chuckle when I think of my earlier days of canning. It was a bit chaotic, with jars falling over and syrup splattering everywhere! But those moments taught me patience and adaptability in the kitchen. Over the years, my apple preserving technique has refined into this easy recipe. And honestly, every batch feels like a mini celebration of fall.
Remember, it’s okay to experiment and make this recipe your own. The kitchen is your playground, so don’t be afraid to add personal touches!
FAQs and Troubleshooting
Q: What if my apple preserves didn’t set properly?
A: If your preserves are too runny, don’t fret! Just return the mixture to the pot, bring it back to a simmer, and cook it for a bit longer until it thickens to your desired consistency.
Q: Can I use other fruits in this recipe?
A: Absolutely! Peaches, pears, or even a combo of mixed berries would work wonderfully. Adjust cooking times accordingly, as different fruits have varying water content.
Q: Why do I need to water bath can my jars?
A: Water bath canning helps create a seal that prevents bacteria from entering the jars, ensuring your preserves stay fresh.
Q: How long can I keep my preserved apples?
A: If properly canned and sealed, you can store your apple preserves for up to a year in a cool, dark place. Once opened, it’s best to refrigerate and consume within two weeks.
Nutritional Info (optional)
While this recipe is a treat, here’s a rough estimate of nutritional values per tablespoon of apple preserves:
- Calories: 50
- Total Fat: 0g
- Total Carbohydrates: 14g
- Sugars: 12g
- Protein: 0g
As you can see, preserving the essence of fall in those delicious apple preserves is an enriching experience that blends nostalgia with creativity. You now hold the tools to create your own little jars of sunshine! So, roll up those sleeves, tie that apron, and let’s keep those sweet moments alive—one scoop at a time. Happy canning!
PrintApple Preserves
A delightful recipe for preserving the essence of autumn with homemade apple preserves, perfect for toast, pancakes, or various dishes.
- Prep Time: 15 minutes
- Cook Time: 30 minutes
- Total Time: 45 minutes
- Yield: 4 servings 1x
- Category: Preserving
- Method: Canning
- Cuisine: American
- Diet: Vegan
Ingredients
- 4 cups apples, peeled and chopped
- 2 cups sugar
- 1 cup water
- 1 tablespoon lemon juice
- 1 teaspoon cinnamon (optional)
- 1/2 teaspoon nutmeg (optional)
- Canning jars
Instructions
- Prep your apples by peeling and chopping them into bite-sized pieces.
- Mix the chopped apples, sugar, and water in a large pot, stirring well.
- Let the mixture sit for about 15 minutes to release natural juices.
- Place the pot over medium heat and bring to a gentle simmer, stirring occasionally.
- Check for doneness after 20-30 minutes by testing the consistency on a plate.
- Remove from heat and ladle the hot preserves into sterilized canning jars.
- Process the jars in a water bath for about 10 minutes to seal.
- Listen for the “pop” sound as jars cool, indicating they’ve sealed properly.
Notes
Experiment with different spices or fruits for variations in flavor. Ensure jars are clean and sterilized before canning.
Nutrition
- Serving Size: 1 tablespoon
- Calories: 50
- Sugar: 12g
- Sodium: 0mg
- Fat: 0g
- Saturated Fat: 0g
- Unsaturated Fat: 0g
- Trans Fat: 0g
- Carbohydrates: 14g
- Fiber: 0g
- Protein: 0g
- Cholesterol: 0mg
Keywords: apple preserves, canning, autumn recipes, homemade jam, apple recipes