
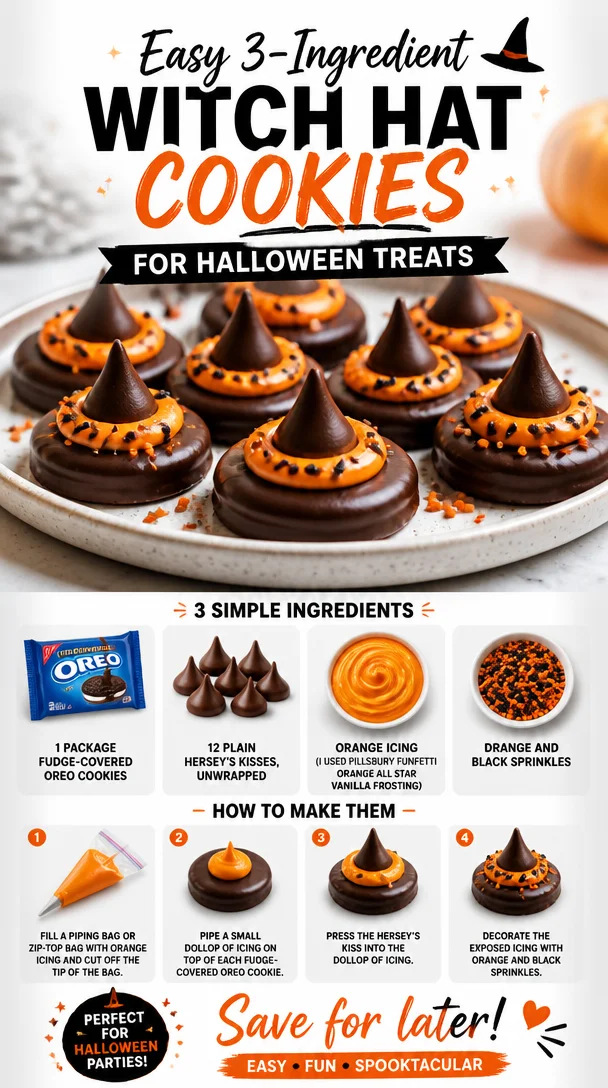
Spooktacular Witch Hat Cookies: A Deliciously Fun Treat for Halloween
Hello, my fellow baking enthusiasts! Tessa Montgomery here, and I can’t wait to share an utterly charming recipe that will elevate your Halloween festivities. Get ready for some spooktacular Witch Hat Cookies that are not only a delight to eat but also a joy to make! Perfect for gathering with kids, impressing your friends, or simply indulging in some festive fun, these cookies capture the essence of Halloween in the most delicious way.
Imagine the joy on faces, young and old, as you present these enchanting treats at your Halloween gathering. With minimal ingredients and maximum fun, these cookies will become your new go-to for every Halloween! Let’s dive into our magical kitchen adventure!
A Whimsical Memory
As a kid, Halloween was always a magical time in my household. The air would turn crisp, and the leaves would take on vibrant shades of red and orange, signaling the shifting season. My mom and I would spend days leading up to the holiday crafting costumes, decorating the house, and of course, baking something sweet. One year, we stumbled upon a fun idea to create witch hats from cookies, complete with pointy tops made of Hershey’s Kisses!
We spent an afternoon in the kitchen, laughter filling the room as we practiced our decorating skills and attempted to create the "spookiest" batches. My mom’s skillful hand guided the icing as I sprinkled on colorful decorations. These witch hats became a family tradition, a delicious way to mark the season. Each bite took me back to those carefree days filled with laughter, love, and sweetness. Since then, it’s been my mission to recreate that Halloween magic every year. Join me as we whip up these delightful treats that ooze nostalgia and creativity!
Ingredients
Let’s gather our supplies! Here’s what you’ll need to craft your very own Witch Hat Cookies:
-
Fudge-covered Oreo cookies (1 package)
The star of the show! The Oreos act as the base for your witch hats. Their chocolatey goodness pairs perfectly with the Hershey’s Kisses. You could also try other chocolate cookies, like chocolate wafers, for a different flavor profile. -
Plain Hershey’s Kisses (12, unwrapped)
These little chocolates are the perfect “point” of your witch hat. If you’re looking for a fun twist, try using other similar candies like Rolos or chocolate-covered caramels! -
Orange icing (I used Pillsbury Funfetti Orange All Star Vanilla frosting)
Bright and cheerful, this icing not only adds a pop of color but also a hint of sweetness that ties the whole cookie together. You can make your own orange icing with powdered sugar, butter, and orange food coloring if you’re up for it! -
Orange and black sprinkles
They add a festive crunch and a bit of flair! Feel free to mix it up with other Halloween-themed sprinkles, like ghosts or candy corn, for a fun twist.
Step-by-Step Instructions
Now that we have our ingredients lined up, it’s time to get baking! This part is so much fun, and I’ll sprinkle in a few tips to help you along the way.
Step 1: Prepare Your Workstation
Start by clearing your counter space, laying down some parchment paper or a silicone baking mat. This will be your "cookie creation station." Set out your Oreo cookies and Hershey’s Kisses, and have your icing and sprinkles at the ready.
Step 2: Assemble the Witch Hats
Take one fudge-covered Oreo and gently squeeze a dollop of orange icing in the center. This will act as the glue for your Hershey’s Kiss! Now, press one unwrapped Hershey’s Kiss firmly onto the icing. Feel free to make this a fun step by posing questions like, “What kind of potion should we put in our hats?”
Step 3: Decorate with Icing
Time to get creative! Once your Kisses are securely in place, use the orange icing to create “accents” around the base of the Kiss—maybe little zigzags or dots. This adds an extra layer of charm and color.
Step 4: Sprinkle the Magic
While the icing is still wet, it’s the perfect time to sprinkle on your orange and black sprinkles. Let your imagination run wild! You could create faces, spooky patterns, or simple outlines. The sprinkles are the “magic dust” that makes your cookies irresistible!
Step 5: Let Them Set
Place your witch hats on a serving platter or a cutting board. Allow the icing to set for about 20-30 minutes so they hold their shape. This is a great moment to gather your tiny sous-chefs or friends for a Halloween-themed chat while waiting!
Step 6: Serve and Enjoy!
Once your cookies have set, you’re ready to serve! Arrange them on a tray for a delightful display. You can place them around a pumpkin centerpiece or add some candy corn for an extra festive touch.
Serving Suggestions
These Witch Hat Cookies are not just tasty; they’re a visual treat! Serve them on a Halloween-themed platter surrounded by miniature pumpkins or skeleton decorations for an enchanting presentation. Pair them with some homemade hot cocoa or apple cider for a cozy boozy treat, and watch your guests oooh and aaah as they indulge in the festive spirit!
Recipe Variations
Let’s get creative! Here are some fun twists and variations to keep your Witch Hat Cookies exciting:
-
Peanut Butter Cups: Swap out Hershey’s Kisses for mini Reese’s Peanut Butter Cups for a chocolate-peanut butter explosion!
-
Flavored Icing: Try vanilla or chocolate icing instead of orange for a different flavor palette while still keeping it festive.
-
Colorful Sprinkles: Use a mix of sprinkles and edible glitter to make your witch hats extra sparkly!
-
Savory Twist: Use cheese crackers as the base instead of Oreos for a sweet and savory combo that surprises the taste buds.
-
Gluten-Free Option: Opt for gluten-free sandwich cookies to accommodate any dietary needs at your gathering.
Chef’s Notes
Baking is about sharing stories, much like the ones around the kitchen table. These cookies have transformed over the years from a simple childhood memory into a fun tradition that delights every Halloween. Every time I make them, I find myself reminiscing about those carefree days with my mom while creating new memories with friends and family. Who knew a cookie could carry so much magic?
Remember, each mishap along the way is a new adventure! If your sprinkles go flying off, or your icing isn’t perfect, just laugh it off—it’s all part of the process.
FAQs and Troubleshooting
-
What do I do if my icing is too runny?
- If your icing isn’t holding shape, try adding more powdered sugar to thicken it, or be sure to let it sit out for a little longer to firm up.
-
Can I make these cookies ahead of time?
- Absolutely! You can prepare the assembled witch hats a day in advance. Just keep them in an airtight container in the fridge to maintain freshness.
-
What if I can’t find fudge-covered Oreos?
- No worries! You can use any chocolate sandwich cookie or even chocolate graham crackers as a delightful alternative.
-
Are these cookies gluten-free?
- To make them gluten-free, use gluten-free sandwich cookies and check that your toppings are safe for a gluten-free diet.
Nutritional Info
(Nutritional info can be calculated separately and adjusted based on specific ingredients used)
Enjoy the Halloween spirit with these fun, delicious Witch Hat Cookies! Whether you’re making them with little helpers or simply whipping them up for yourself, remember that the magic of baking is in the love you pour into each cookie. Happy baking, my friends! 🍂🦇
PrintSpooktacular Witch Hat Cookies
Delightfully fun and festive Witch Hat Cookies that capture the essence of Halloween!
- Prep Time: 15 minutes
- Cook Time: 0 minutes
- Total Time: 45 minutes
- Yield: 12 servings 1x
- Category: Dessert
- Method: No-Bake
- Cuisine: American
- Diet: Vegetarian
Ingredients
- 1 package fudge-covered Oreo cookies
- 12 unwrapped plain Hershey’s Kisses
- Orange icing (Pillsbury Funfetti Orange All Star Vanilla frosting or homemade)
- Orange and black sprinkles
Instructions
- Prepare your workstation by clearing your counter space and laying down parchment paper or a silicone baking mat.
- Assemble a fudge-covered Oreo by squeezing a dollop of orange icing in the center and pressing an unwrapped Hershey’s Kiss on top.
- Decorate with orange icing to create accents around the base of the Kiss.
- Sprinkle orange and black sprinkles on the wet icing for a festive touch.
- Let the cookies set for about 20-30 minutes so the icing hardens.
- Serve them on a tray for a delightful Halloween display.
Notes
These cookies can be made ahead of time and stored in an airtight container. For variations, consider using different candies or cookie bases!
Nutrition
- Serving Size: 1 cookie
- Calories: 150
- Sugar: 10g
- Sodium: 120mg
- Fat: 8g
- Saturated Fat: 3g
- Unsaturated Fat: 4g
- Trans Fat: 0g
- Carbohydrates: 18g
- Fiber: 0g
- Protein: 1g
- Cholesterol: 5mg
Keywords: Halloween, cookies, dessert, witch hats, festive treats