
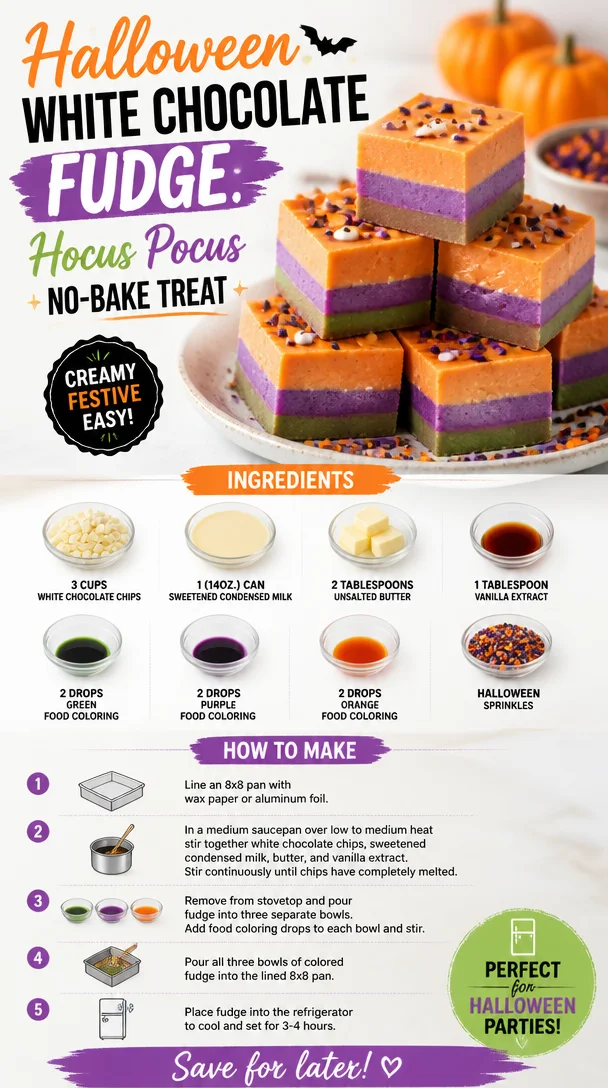
Hocus Pocus Fudge: A Spellbinding Easy White Chocolate Fudge Recipe
Gather ’round, fellow food lovers, as we dive into a magical treat that’s perfect for sprucing up your fall festivities! If there’s one dessert that embodies the spirit of Halloween, it has to be my Hocus Pocus Fudge. This easy white chocolate fudge is not only a visual delight with its vibrant Halloween colors, but it’s also a deliciously creamy and sweet indulgence that will leave your taste buds enchanted. And the best part? It’s so simple to make that even the most novice of bakers can whip it up in no time.
So, grab your cauldron—I mean, pot—and let’s get started on a Halloween treat that’s as fun to make as it is to eat!
A Sweet Memory from My Kitchen
Before I unveil the recipe, let me share a little kitchen story that will warm your heart like a cozy fall evening. One Halloween, I decided to host a small gathering with friends, complete with spooky decorations, themed games, and, of course, a fudge-making session. As we donned our witch hats and gathered in the kitchen, the air was filled with laughter and banter.
We melted our white chocolate and added the vibrant food coloring in a melodious swirl. My best friend, Emma, took over the sprinkles—she always had a knack for making any dessert look like a party! We poured the colorful mixture into a baking dish, and as it set, we could hardly contain our excitement. That evening, with our fudge set and a Halloween movie playing in the background, we dove into a spirit of joy and nostalgia, as sweet as the fudge itself. Those moments remind me that baking is truly about the connections we create—one scoop at a time.
Ingredients
Here’s what you’ll need to conjure up your own batch of Hocus Pocus Fudge:
-
3 cups white chocolate chips
Perfectly creamy, these chips are the star of the show. You can substitute them with chopped white chocolate bars if you prefer a richer flavor. -
1 (14 oz.) can sweetened condensed milk
This ingredient adds an incredible creaminess to the fudge. Don’t have any? You can create your own by simmering milk and sugar, but it’s much easier just to use the can! -
2 tablespoons unsalted butter
A little butter enhances the richness. If you’re looking for a dairy-free option, coconut oil works nicely. -
1 tablespoon vanilla extract
The ol’ reliable flavor booster! You could go adventurous and use almond extract for a different twist. -
2 drops green food coloring
A dash of Halloween magic! You could use matcha powder for a more natural option, which also adds a lovely flavor. -
2 drops purple food coloring
Another splash to make it festive! If purple food coloring isn’t available, you can substitute with a little blueberry juice (just watch the liquid balance). -
2 drops orange food coloring
for those classic Halloween vibes! Carrot juice can work too, keeping it on the healthier side. -
Halloween sprinkles
These fun decorations add that finishing touch, making each piece pop like a true Halloween treat. Feel free to get creative with colors and shapes!
Step-by-Step Instructions
Ready to start your white chocolate fudge adventure? Let’s go! Here’s how to make this deliciousness step-by-step:
-
Prep Your Baking Dish
Start by lining an 8-inch square baking dish with parchment paper, allowing some overhang for easy removal later. This little hack will save you from a sticky situation! -
Melt the White Chocolate
In a medium saucepan over low heat, combine the white chocolate chips, sweetened condensed milk, and butter. Stir continuously with a spatula or wooden spoon until melted and smooth. Keeping the heat low is key here to avoid burning the chocolate—slow and steady wins the race! -
Add Vanilla and Food Coloring
Remove the pot from the heat and stir in the vanilla extract. Now for the fun part! Divide the melted mixture into three separate bowls. Add the green food coloring to one bowl, purple to another, and orange to the last. Stir until each bowl is evenly colored. Don’t be shy—go for bright and vibrant shades! -
Layer the Colors
Now, it’s time to create a beautiful marble effect. Using a spoon, drop spoonfuls of each color into the lined baking dish, alternating and adding until the dish is filled. You can also swirl the colors gently with a knife for a marbled effect. Trust me, you’ll want to play around a little to make it fun! -
Add Sprinkles
Before the fudge sets, shower those Halloween sprinkles over the top! This helps them stick while the fudge cools and sets. -
Chill to Set
Pop your baking dish into the fridge for about 2-3 hours, or until the fudge is firmly set. Patience is a virtue here—it’ll be worth the wait! -
Slice and Serve
Once set, lift the fudge out of the dish using the parchment paper, and cut it into squares. And there you have it—your very own Hocus Pocus Fudge ready to enchant friends and family!
Serving Suggestions
Serve your Hocus Pocus Fudge on a festive platter or in cute treat bags for a party favor. It pairs beautifully with warm spiced apple cider or even a cup of coffee to balance out the sweetness. For an extra special touch, I recommend adding a ghostly meringue on top for that real Halloween flair!
Recipe Variations
Get adventurous with these fun twists on the classic recipe:
- Nutty Delight: Fold in some chopped nuts like pecans or almonds for a delightful crunch.
- Spiced Pumpkin Fudge: Replace some of the white chocolate with pumpkin puree and add cinnamon and nutmeg for a festive autumn flavor.
- Add-Ins: Think about throwing in crushed candy corn for a fun texture and extra sweetness.
- Dark Chocolate Drizzle: After the fudge sets, drizzle some melted dark chocolate over the top for that extra indulgence!
- Vegan Fudge: Use dairy-free white chocolate chips and coconut milk for a vegan version that’s just as scrumptious.
Chef’s Notes
This Hocus Pocus Fudge has evolved right alongside my baking journey—what started as a festive treat for friends quickly became a staple at every Halloween gathering! Different friends had different favorite additions, from crushed pretzels to caramel swirls, turning this simple fudge into a canvas for creativity. Plus, who wouldn’t love a recipe that brings friends together?
And here’s a little inside scoop: I once accidentally added too much food coloring, leading to a batch so vibrant I almost needed sunglasses to look at it! But you know what? It still tasted fantastic, and it also became my most Instagrammed dessert of the season!
FAQs and Troubleshooting
1. Why did my fudge turn out grainy?
This can happen if the chocolate overheats. Always keep your heat low and stir continuously to achieve a smooth texture.
2. My fudge isn’t setting – what can I do?
Sometimes fudge needs a little longer in the fridge. If it’s still soft after a couple of hours, give it more time.
3. Can I freeze this fudge?
Absolutely! Wrap tightly in foil or plastic wrap and store in an airtight container. It should last for up to 3 months. Just let it thaw at room temperature before enjoying.
4. How do I prevent my fudge from sticking?
A lined baking dish is your best friend! Additionally, if you find it’s still sticking, a quick spray of cooking oil on the parchment paper helps.
Nutritional Info (Optional)
While indulgent and sweet, remember that a little bit goes a long way! Each square of Hocus Pocus Fudge is a delightful treat that can be enjoyed in moderation.
There you have it—my guide to creating Hocus Pocus Fudge that will undoubtedly charm its way into your heart (and home). Let the baking adventures begin! Remember to share your creations, and most importantly, savor every spoonful of joy. Happy Halloween!
PrintHocus Pocus Fudge
A spellbinding and easy white chocolate fudge recipe perfect for Halloween festivities.
- Prep Time: 15 minutes
- Cook Time: 30 minutes
- Total Time: 45 minutes
- Yield: 16 servings 1x
- Category: Dessert
- Method: Chilling
- Cuisine: American
- Diet: Vegetarian
Ingredients
- 3 cups white chocolate chips
- 1 (14 oz.) can sweetened condensed milk
- 2 tablespoons unsalted butter
- 1 tablespoon vanilla extract
- 2 drops green food coloring
- 2 drops purple food coloring
- 2 drops orange food coloring
- Halloween sprinkles
Instructions
- Prep your baking dish by lining an 8-inch square baking dish with parchment paper.
- Melt the white chocolate in a saucepan over low heat with sweetened condensed milk and butter.
- Add vanilla extract to the melted mixture and divide into three bowls.
- Layer the colors by dropping spoonfuls of each colored mixture into the lined dish.
- Add sprinkles before the fudge sets.
- Chill in the fridge for 2-3 hours until firm.
- Slice into squares and serve.
Notes
Serve Hocus Pocus Fudge on a festive platter or in treat bags. Pairs well with warm spiced apple cider.
Nutrition
- Serving Size: 1 square
- Calories: 200
- Sugar: 20g
- Sodium: 50mg
- Fat: 10g
- Saturated Fat: 6g
- Unsaturated Fat: 3g
- Trans Fat: 0g
- Carbohydrates: 25g
- Fiber: 0g
- Protein: 2g
- Cholesterol: 10mg
Keywords: Halloween, fudge, dessert, white chocolate, easy recipe