
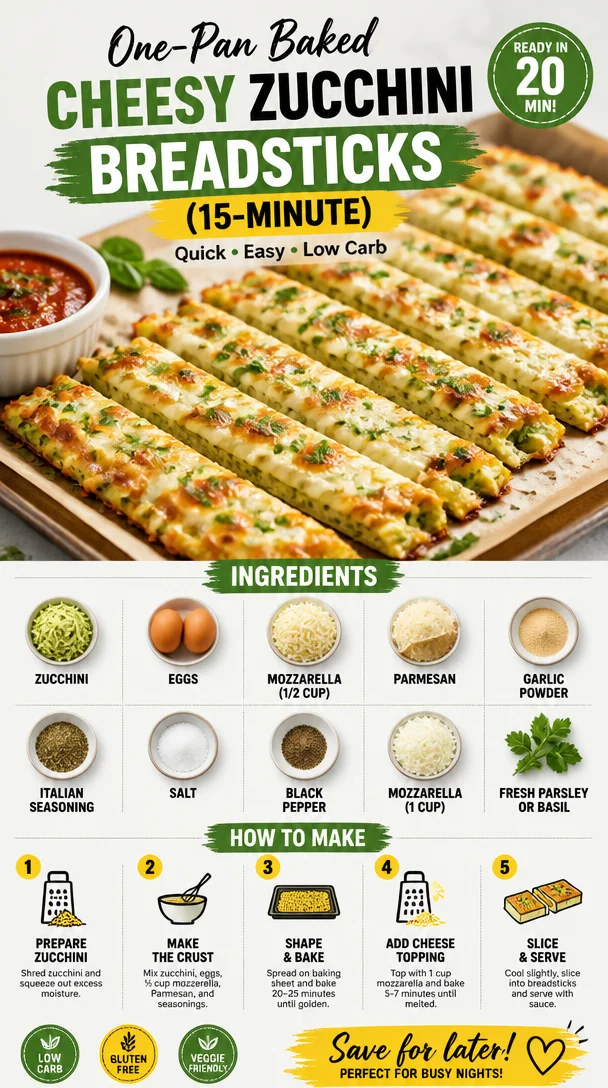
Cheesy Zucchini Breadsticks: The Ultimate Comfort Snack
Hello, fellow food lovers! Are you ready to dive into a delicious, cheesy adventure that will certainly warm your heart and satisfy your cravings? Today, I’m thrilled to share one of my all-time favorite recipes: Cheesy Zucchini Breadsticks! These delightful bites are the perfect blend of comfort and creativity, so let’s roll up our sleeves, preheat that oven, and get ready to make something special.
Bringing Back My Zucchini Memories
Growing up, my grandmother had a magical way of transforming simple ingredients into mouthwatering treats. Zucchini was always abundant in her garden, and summer days were filled with the delightful aroma of her famous zucchini bread wafting through the house. I remember running to the kitchen, drawn by the scent, only to find her expertly grating zucchinis while chatting about her day.
One lazy afternoon, I stood on a stool beside her, eager to help. With a wooden spoon in hand, I tried to mimic her smooth motions, but I mostly ended up making a mess. However, my enthusiasm was contagious, and she couldn’t help but chuckle as I "cooked." My grandmother’s secret? Cheese! She’d toss in generous handfuls of cheesy goodness to elevate every recipe she created. That’s how these Cheesy Zucchini Breadsticks were born—using her well-worn recipe as inspiration but putting our own twist on it.
So, whether you’re channeling your inner kitchen maven or finding your way into the world of baking, I promise these breadsticks will evoke their own slice of nostalgia in your home.
Ingredients for Cheesy Zucchini Breadsticks
Let’s get into the nitty-gritty of what you’ll need for this delicious snack. Here’s your ingredient list:
-
2 medium zucchinis (about 2 cups shredded): The star of the show! Zucchini adds moisture and a subtle green flavor. If you’re in a pinch, summer squash works as a great substitute.
-
2 large eggs: Binding everything together, eggs provide structure. If you’re looking for an egg-free option, flax eggs (1 tablespoon ground flaxseed mixed with 2.5 tablespoons water) work beautifully!
-
½ cup shredded mozzarella cheese: Creamy and melty, mozzarella is crucial for that cheesy pull. You can swap it for Monterey Jack or even vegan cheese for a lighter or plant-based version.
-
¼ cup grated Parmesan cheese: This adds a nutty depth to the flavor. If you don’t have Parmesan, Pecorino Romano works similarly, or nutritional yeast provides a vegan alternative packed with flavor!
-
1 teaspoon garlic powder: To pack in some savory goodness, garlic powder is a must. Fresh minced garlic can be used if you want a stronger flavor—just keep in mind that it may alter the texture slightly.
-
1 teaspoon Italian seasoning: A little touch of herbs to make everything sing—feel free to mix your own blend with dried basil, oregano, and thyme or grab your favorite commercial mix.
-
½ teaspoon salt: Enhances all the flavors! You can adjust this according to your taste, especially if you’re watching your sodium intake.
-
¼ teaspoon black pepper: A pinch of pepper adds depth and slight heat. Feel free to brainstorm with different peppers like red chili flakes for added kick!
-
1 cup shredded mozzarella cheese (for topping): More cheese means more happiness! Use a blend of your favorite cheeses if you’re feeling creative.
-
Optional: fresh parsley or basil for garnish: A pop of color and fresh flavor to finish off your beautiful breadsticks.
Step-by-Step Instructions
Alrighty, now that we have our ingredients laid out, let’s get baking! Follow these step-by-step instructions, and I’ll share some tips along the way:
-
Preheat your oven to 400°F (200°C). Preheating is key; it sets a solid stage for baking perfection!
-
Prepare your zucchinis by rinsing and grating them. Place the shredded zucchini in a clean kitchen towel and twist it to drain as much moisture as possible. This is important for achieving that perfect breadstick texture—nobody likes soggy snacks!
-
In a large mixing bowl, combine the drained shredded zucchini, eggs, half a cup of mozzarella cheese, Parmesan cheese, garlic powder, Italian seasoning, salt, and black pepper. Mix everything together until well combined. Get in there with your hands if you want to feel the texture—trust me, it’s satisfying!
-
Line a baking sheet with parchment paper or grease it lightly with cooking spray. This prevents sticking and makes cleanup a breeze.
-
Spread the mixture onto the baking sheet, forming a rectangular shape that’s about ¾ inch thick. Feel free to use a spatula to create clean edges. A thinner layer means crispier sticks, but don’t stress if it’s not perfect; baking is all about embracing the journey!
-
Bake in the preheated oven for 20–25 minutes, or until the edges are golden brown and center is set. Keep an eye on it—ovens can vary!
-
Remove from the oven and sprinkle the remaining cup of mozzarella cheese over the top. Return to the oven for an additional 5–7 minutes, until that cheese is beautifully melted and bubbly.
-
Let the breadsticks cool for a few minutes before slicing them into stick-like pieces. I recommend using a sharp knife or pizza cutter for clean slices.
Serving Suggestions
These Cheesy Zucchini Breadsticks are perfect for snacking or as a side dish. Serve them warm with a side of marinara sauce for dipping, or enjoy them straight from the tray topped with fresh herbs for an added touch of flavor.
Recipe Variations
Feeling adventurous? Here are a few creative twists you can try with this recipe:
-
Spice it up: Add red pepper flakes or jalapeños for a spicy kick!
-
Cheddar lovers: Replace part of the mozzarella with sharp cheddar for a different flavor profile that’s oh-so-delicious.
-
Herb enthusiasts: Toss in fresh herbs like finely chopped basil or chives instead of or alongside Italian seasoning for a fresh burst.
-
Gluten-free option: Substitute the flour with almond flour or coconut flour if you’d like a gluten-free twist.
-
As a pizza stick: Top with pizza sauce, pepperoni, and mozzarella for a fun play on pizza breadsticks!
Chef’s Notes
I love how this recipe has evolved over the years. What started as a way to use up the extra zucchini in the garden has turned into a go-to snack for gatherings! One time, I experimented and made them with different cheeses and herbs. The combination of smoked gouda and thyme was a total game changer!
While baking, I’ve had my mishaps (like using liquid instead of dried herbs—yikes!). But it’s those little moments that teach us to embrace the process. So throw on your favorite playlist, savor the smell of cheese, and enjoy the simplicity of creating something delightful!
FAQs and Troubleshooting
Q: Why are my breadsticks too moist?
This might happen if the zucchini wasn’t drained properly. Always wring out the moisture with a towel to avoid sogginess.
Q: Can I store leftovers?
Absolutely! Store in an airtight container in the fridge for up to 3 days. Reheat in the oven for the best texture.
Q: Can I freeze these breadsticks?
Yes! Freeze them in a single layer and transfer to a freezer-safe bag. Just bake from frozen for 10-15 more minutes when you’re ready to enjoy.
Q: Can I add other vegetables?
Totally! Grated carrots or bell peppers can add extra flavor and color. Just be sure to drain them well, too.
Feel free to drop any other questions in the comments below!
Nutritional Info (Optional)
While I always encourage enjoying food in moderation, here’s a rough idea of the nutritional profile per serving (based on 8 servings):
- Calories: 140
- Protein: 8g
- Carbs: 6g
- Fat: 10g
Happy baking, and may your kitchen be filled with the delightful aroma of Cheesy Zucchini Breadsticks! I can’t wait for you to try these and make your own delicious memories. Let’s bake something sweet together!
PrintCheesy Zucchini Breadsticks
Delicious cheesy zucchini breadsticks that are perfect for snacking or as a side dish, inspired by a cherished family recipe.
- Prep Time: 15 minutes
- Cook Time: 25 minutes
- Total Time: 40 minutes
- Yield: 8 servings 1x
- Category: Snack
- Method: Baking
- Cuisine: Italian
- Diet: Vegetarian
Ingredients
- 2 medium zucchinis (about 2 cups shredded)
- 2 large eggs
- ½ cup shredded mozzarella cheese
- ¼ cup grated Parmesan cheese
- 1 teaspoon garlic powder
- 1 teaspoon Italian seasoning
- ½ teaspoon salt
- ¼ teaspoon black pepper
- 1 cup shredded mozzarella cheese (for topping)
- Optional: fresh parsley or basil for garnish
Instructions
- Preheat your oven to 400°F (200°C).
- Prepare your zucchinis by rinsing and grating them.
- Combine the drained shredded zucchini, eggs, half a cup of mozzarella cheese, Parmesan cheese, garlic powder, Italian seasoning, salt, and black pepper in a large mixing bowl.
- Line a baking sheet with parchment paper or grease it lightly with cooking spray.
- Spread the mixture onto the baking sheet, forming a rectangular shape that’s about ¾ inch thick.
- Bake in the preheated oven for 20–25 minutes, or until the edges are golden brown.
- Remove from the oven and sprinkle the remaining cup of mozzarella cheese over the top.
- Return to the oven for an additional 5–7 minutes, until the cheese is melted and bubbly.
- Let the breadsticks cool for a few minutes before slicing them into stick-like pieces.
Notes
Store leftovers in an airtight container in the fridge for up to 3 days. They can be frozen and baked from frozen for 10-15 more minutes.
Nutrition
- Serving Size: 1 serving
- Calories: 140
- Sugar: 2g
- Sodium: 300mg
- Fat: 10g
- Saturated Fat: 4g
- Unsaturated Fat: 6g
- Trans Fat: 0g
- Carbohydrates: 6g
- Fiber: 1g
- Protein: 8g
- Cholesterol: 70mg
Keywords: zucchini, breadsticks, snack, vegetarian, cheesy, comfort food