
Red, White, and Blue Cheesecake Salad: A Festive Delight
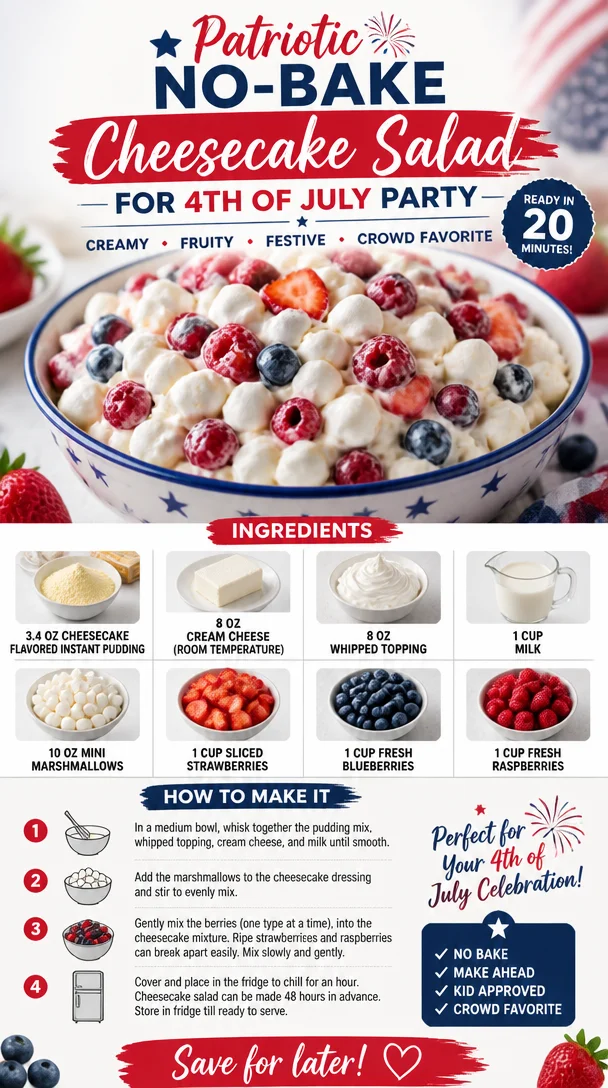
Hey there, fellow food lovers! Today, I’m thrilled to share one of my all-time favorite summer desserts that brings a touch of nostalgia to every gathering: Red, White, and Blue Cheesecake Salad. This delightful dish is perfect for those sunny days spent outdoors, celebrating holidays, or simply enjoying the warm company of friends and family. Let’s dive into this scrumptious recipe that’s as easy to whip up as it is to enjoy!
A Personal Story: The Backyard Gatherings
Every summer, my family hosted a backyard barbecue that became the highlight of my childhood. I vividly remember the scent of grilled burgers wafting through the air and the sound of laughter as we all gathered to celebrate. One dish that always made an appearance on our dessert table was a layered berry salad. While it was delightful, I decided to give it a unique twist by incorporating the flavors of cheesecake. The first time I made my Red, White, and Blue Cheesecake Salad, I watched my family’s faces light up as they dug into the creamy, fruit-laden goodness. It was a smash hit, and now this dish holds a special place in my summer celebrations!
Ingredients: What You’ll Need
To create this festive dessert, gather the following ingredients. Each has its own charm:
-
3.4 oz Cheesecake flavored instant pudding
This is the secret to achieving that rich cheesecake flavor without the fuss of baking. If you can’t find cheesecake pudding, vanilla pudding works beautifully as a substitute. -
8 oz Cream Cheese (room temperature)
Make sure it’s softened to blend smoothly into the mixture. If you’re dairy-free, you can substitute with a vegan cream cheese. -
8 oz Whipped Topping
This light and airy component adds fluffiness to the salad. If you’re feeling adventurous, homemade whipped cream can elevate the dish even further! -
1 cup Milk
The milk activates the pudding and brings everything together. For a creamier texture, consider using half-and-half. -
10 oz Mini Marshmallows
These bring sweetness and a fun texture. If you’re looking for a healthier option, you can opt for mini marshmallow alternatives made from natural sweeteners. -
1 cup Sliced Strawberries
Fresh and vibrant, strawberries are a must for that pop of color. You can swap these for diced peaches or any seasonal fruit if you prefer. -
1 cup Fresh Blueberries
These tiny gems pack a punch of antioxidants and color. Frozen blueberries can work in a pinch, but fresh ones are always the best! -
1 cup Fresh Raspberries
Their tartness perfectly balances the sweetness of the other ingredients. If you’re not a fan, consider mixing in blackberries instead.
Step-by-Step Instructions: Bringing It All Together
Ready to create a dessert masterpiece? Let’s get started:
-
Prep the Cream Cheese
Make sure your cream cheese is at room temperature for easy mixing. In a large mixing bowl, use a hand mixer to whip it until it’s smooth and creamy. This step is crucial to avoid any lumps. Trust me, no one likes a chunky cheesecake salad! -
Combine the Pudding Mix and Milk
Add the cheesecake flavored instant pudding to the cream cheese. Pour in that cup of milk. Keep mixing until it’s all well combined. Give it a taste—this step is like an official quality control check. You deserve to sneak a spoonful! -
Fold in the Whipped Topping
Now, gently fold in the whipped topping using a spatula. Be careful not to deflate that extra fluffiness. You want lightness here, folks. -
Add the Mini Marshmallows
Toss in the mini marshmallows. Stir until they’re evenly mixed into the cheesecake mixture. These little bites of sweetness are going to be a hit! -
Layer with Berries
In a large serving bowl or individual cups, start layering your mixture, beginning with a scoop of the cheesecake salad and followed by a layer of strawberries, blueberries, and raspberries. Repeat until you reach the top. You want that joyful red, white, and blue look shining through! -
Chill Before Serving
Cover the salad and let it chill in the refrigerator for at least an hour (though I usually let it sit overnight for the flavors to meld). This is the perfect time to plan your next gathering. -
Serve with a Smile
When you’re ready to serve, scoop out generous portions and enjoy the smiles it brings to your table.
Serving Suggestions
This Red, White, and Blue Cheesecake Salad looks stunning served in a beautiful glass bowl, letting all those vibrant layers shine! For individual servings, clear cups or mason jars add a personal touch. Consider garnishing with a sprig of mint or a drizzle of chocolate for an extra wow factor.
Recipe Variations
Feeling adventurous? Here are a few fun twists you can try:
- Patriotic Trifle: Layer the cheesecake salad with crumbled graham crackers for a fun trifle effect.
- Tropical Twist: Swap out the berries for diced mango, pineapple, and kiwi for a tropical vibe.
- Nutty Delight: Add chopped nuts (like pecans or walnuts) into the mix for added crunch and flavor.
- Chocolate Cheesecake Version: Use chocolate-flavored instant pudding instead of cheesecake pudding for a rich chocolate experience.
- Dairy-Free Option: Use coconut cream instead of whipped topping and dairy-free cream cheese for a delicious dairy-free dessert.
Chef’s Notes
Over the years, I’ve fine-tuned this Cheesecake Salad recipe to make it easier and even more enjoyable. One of my funniest kitchen stories centers around forgetting to take the cream cheese out of the fridge, only to find out at mixing time that it’s still hard as a rock! Pro-tip: always set a timer for prep and keep your ingredients organized—it saves stress in the long run.
FAQs and Troubleshooting
Q: Can I make this salad in advance?
Absolutely! Preparing this salad the night before allows the flavors to meld beautifully. Just cover it tightly and keep it chilled until you’re ready to serve.
Q: What if my mixture is too thick?
If you find the mixture is thicker than you’d like, you can gently fold in a bit more milk. Start with a tablespoon at a time until it reaches your desired consistency.
Q: Can I use frozen berries?
Yes, but be warned that they can release extra juice once thawed, which may make your salad slightly runnier. If using frozen fruit, add them right before serving for the best texture!
Q: How long will this salad keep in the fridge?
This delicious dessert will last about 3 to 5 days in the fridge, but I guarantee it won’t last that long once everyone takes a bite!
Nutritional Info
(Include nutritional info here if applicable, but for this recipe, it’s best to focus on the joyous sharing and experience!)
And there you have it! A refreshing, crowd-pleasing Red, White, and Blue Cheesecake Salad that’s sure to be a hit at your next gathering. Now, go grab your aprons and start celebrating the sweetness in every bite! 🍓🫐
PrintRed, White, and Blue Cheesecake Salad
A festive, no-bake cheesecake salad featuring layers of strawberries, blueberries, and raspberries, making it perfect for summer gatherings.
- Prep Time: 15 minutes
- Cook Time: 0 minutes
- Total Time: 60 minutes
- Yield: 8 servings 1x
- Category: Dessert
- Method: No-Bake
- Cuisine: American
- Diet: Vegetarian
Ingredients
- 3.4 oz Cheesecake flavored instant pudding
- 8 oz Cream Cheese (room temperature)
- 8 oz Whipped Topping
- 1 cup Milk
- 10 oz Mini Marshmallows
- 1 cup Sliced Strawberries
- 1 cup Fresh Blueberries
- 1 cup Fresh Raspberries
Instructions
- Prep the cream cheese in a large mixing bowl using a hand mixer to whip it until it’s smooth and creamy.
- Combine the pudding mix and milk with the cream cheese, mixing until well combined.
- Fold in the whipped topping gently using a spatula.
- Add the mini marshmallows and stir until evenly mixed.
- Layer the mixture with strawberries, blueberries, and raspberries in a serving bowl or cups.
- Chill in the refrigerator for at least 60 minutes.
- Serve and enjoy!
Notes
Consider garnishing with mint or chocolate drizzle. You can also prepare this a day in advance for enhanced flavor.
Nutrition
- Serving Size: 1 serving
- Calories: 220
- Sugar: 18g
- Sodium: 150mg
- Fat: 11g
- Saturated Fat: 6g
- Unsaturated Fat: 4g
- Trans Fat: 0g
- Carbohydrates: 27g
- Fiber: 1g
- Protein: 3g
- Cholesterol: 25mg
Keywords: cheesecake salad, berry dessert, summer dessert, no-bake dessert, festive dessert